Virtualization
What is virtualizationvirtualization?
- In computing, it means that we are giving the illusion of something physical, when in reality it may not be physically tangible.
- Virtual memory - the operating system thinks that there is enough memory to run many processes.
- Virtual disks
- a.k.a RAM disks uses memory to give the illusion of a physical drive.
- CD/DVD images can be mounted as if they were a physical device.
- Virtual file systems - make all different file systems look the same. (NTFS, XFS, Btrfs, etc.)
- So, a virtual machinevirtual machine (computer) is a logical representation of a machine in software.
- In fact, early CD players for computers tried to recreate the look of a real, physical CD player:

- Virtual machines have been around since the 1960s.
- Most modern processors provide support for virtualization within the CPU itself.
Why virtualization?
- Cost of ownership. A virtual machine costs less than a real machine.
- Make better use of the computer's resources.
- Virtualization is "green". Less power consumption.
- Need a particular version of an OS to run a particular app. Older OS may not run on newer hardware.
- Isolate programs that could crash the entire system. Only the virtual machine will crash.
- Moving the entire "computer" is simply a file copy operation. Put it on a USB drive and take it anywhere.
- Many others...
Background
- A computer system is made up of layers.
- The hardware is the lowest level in the system.
- The kernel running above the hardware uses instructions to create a set of system calls for use by higher layers.
- With a virtual machine, the VM sits between the kernel and the hardware.
- The kernel is unaware that it is not communicating directly with the hardware.
- The application programs still talk to the kernel via system calls.
- Finally, this layered approach is taken to its logical conclusion in the concept of virtual machines.
How do virtual machines work?
Advantages and disadvantages of the virtual machine
- The virtual-machine concept provides complete protection of system resources.
- Each virtual machine is isolated from all other virtual machines.
- This isolation, however, permits no direct sharing of resources. (Pros and cons)
- A virtual machine system is great for operating systems research and development.
- Actually, it's great for all types of development, especially potentially harmful ones.
- System development is done on the virtual machine, instead of on a physical machine and so does not disrupt normal system operation.
- The virtual machine concept is difficult to implement due to the effort required to provide an exact duplicate to the underlying machine.
- Performance is another difference, depending on the exact implementation of the virtualization.
- However, the benefits of virtualization vastly outweigh the performance issues (which are always getting better).
Available Virtual Machines
- There are dozens of different virtual machine products, some are free (including source code), some are proprietary.
- Each one emulates a certain set of hardware and varies. (Which hardware?)
- A short list (licensing can be proprietarproprietary,
GPLGPL,
GPLv2GPLv2,
and others)
- We are going to look at VirtualBox
- It supports a wide-range of operating systems, including Windows, Linux, and Mac (experimental due to Apple's licensing restrictions).
- It's free. (What's not to like?)
- It has many of the featuresfeatures that other, more expensive products have.
- It has very few limitations or restrictionsrestrictions on the amounts and sizes of resources it can handle.
- Guest operating systems are nearly as fast as the host operating system.
- Did I mention that it was free?
The first thing is to download the software from the Virtual Box website. You have to choose the software that matches
the operating system where you are going to install it (e.g. Windows, Linux, Mac OS X).
Since all of the computers at Digipen (and most student computers) run Windows, we will download the Windows version of VirtualBox.
If you have a Mac, you should download the version for that. And if you're already running Linux, but not Mint, you can download
the version of VirtualBox for Linux, and run Mint in that virtual machine.
The next thing is to choose what operating system you want to virtualize (i.e. run alongside of your host operating system). Linux is a great choice because there
are over 100 distributions and they are all free. Plus, since we're studying operating systems, Linux is by far the best choice for that.
If you have a copy of Windows (most any recent version), you can also
virtualize that. However, I suspect most students are already running Windows, and it's a Unix-like operating system (Linux, Mac OS X) that they lack. So, we
will create a Linux virtual machine running inside a Windows host machine.
I am going to choose Linux Mint. The choice of a particular Linux distribution can be somewhat personal. As stated, there are over
100 different distributions and they all target a different audience. If Linux Mint isn't to your liking (for whatever reason, and there could be many), you simply
choose another one. However, until you've worked in a Linux environment, you won't really know what the differences are. The good thing is that Linux is free, so
you can try every one of them until you find one you like! Compare this to proprietary operating systems where you may not have much of a choice. You take it or leave it.
Anyway, I'm not going to get into the almost-religious debate about which operating system or distribution is better. That's for another time.
Oh, and in case you're wondering why I chose Mint, I'm not the only one that thinks it is a great distribution.
Popular Linux distributions include:
- Ubuntu - A very popluar version (maybe still the most popular), the word ubuntu means "humanity towards others" (website)
- Mint - Some people say it is "Ubuntu done right." (website)
- Fedora - A community developed version of Red Hat's Enterprise Linux (website)
- openSUSE - A community developed version of SUSE Enterprise Linux (Mead ran this for about 10 years) (website)
- Debian - One of the most influential Linux distros. Several popular ones are derived from Debian. (website)
- PCLinuxOS - A user-friendly distro that targets ease-of-use. (website)
- CentOS - A 100% compatible Red Hat Enterprise Linux, without cost for support. (website)
- Gentoo - A fast distro aimed at developers and professionals. (website)
- Slackware - From Patrick Volkerding. It was the first version I ever used back in 1994. (website)
- Mageia - Mandrake Linux + Conectiva Linux = Mandriva Linux, later to become Mageia. (website)
- RedHat - One of the biggest commercial versions of Linux. (website)
Check out Distrowatch for many others. Before making a choice you should read their overview of the major distributions.
It will give you some insight into why Linux has so many choices.
Here is the GNU/Linux Distribution Timeline to see where distributions come from.
Another reason for getting familiar with a Unix-like operating system is because it has influenced so many operating systems. It's important to be familiar with the concepts behind the most widely-used (and/or imitated) operating system.
In addition to UnixUnix itself, other Unix-likeUnix-like
operating systems include:
- LinuxLinux - This is the obvious one. Probably used in more devices than everything else combined.
If you're new to Linux, you should check out this short video to see just how popular Linux is.
Most supercomputers run Linux.
- macOSMacOS X (formerly OS X, formerly Mac OS X) - From Apple for Macintosh desktop computers.
- iOSiOS - From Apple and runs on the iPod, iPad, and iPhone. All very popular devices.
- AndroidAndroid - From Google, based on the Linux kernel. It is the most widely-used cellphone OS.
Plus, it is run on countless devices like TVs, DVRs, routers, and small form-factor computers like the
Raspberry PiRaspberry Pi.
So, in a nutshell, Linux and Unix-like operating systems are the most widely used operating systems on the planet and they're getting more popular every day.
|
VirtualBox for Windows comes with an installer and should be a very straight-forward installation process. And, since there is already a very good website set up for VirtualBox, I'm going to
redirect you there, rather than re-write hundreds of pages of excellent documentation.
- Downloads - This is the place to start to download and install the software. You need to download the software for
the platform you want to run VirtualBox on. For most students, that will be the Windows version (x86/amd64). The download includes software for 32-bit and 64-bit processors.
- The User Manual - Yes, I know that many students don't read the documentation, but you need to start doing so. The documentation comes in 2 flavors:
- HTML - Read the online docs via a web browser
- PDF - Read the docs in a PDF. (This document is included with the installer.)
- HOW-TOS - How to do specific things (e.g. installing, networking) with VirtualBox.
- Technical Docs - More technical information about VirtualBox that the advanced students may want to know.
Virtual box comes with a guided "wizard" that makes virtual machine creation very simple.
Note: The distribution to use is Linux Mint 64-bit. The 64-bit version will help you understand
the differences (problems) when porting 32-bit programs to 64-bit. Most of the software that you will likely run
for the forseeable future is going to be 64-bit. It is time to start learning how to deal with that.
I've put together a very detailed step-by-step of creating a virtual machine and installing Linux Mint, complete
with dozens of screenshots. You can find it here.
These are the first steps you should perform after you've install Linux into a virtual machine. By the way,
installing, upgrading, and removing software (packages) is done with a command-line program called
apt-get. You need to be the administrator (root) to use it. Some information about
it can be found here.
- Install Guest Additions - You do this from the Devices menu in the Virtual Box Manager. Choose Install Guest Additions... from that menu.
Answer "yes" or "OK" to any questions.
Note that this step may no longer be required with the recent versions of Linux Mint.
Some versions seem to have these additional capabilities already installed. Installing them from
the Virtual Box Manager may actually cause problems if they are different versions.
Update: I'm not sure why, but it seems that Windows 10 requires these Guest Additions
to be installed. Without them, I find that there are no shared folders and that you can't copy/paste
between operating systems.
- In Linux, open up a terminal and type:
mintsources
You will be prompted for your password. A window will be displayed that will allow
you to tell Linux Mint which servers to use to download from:
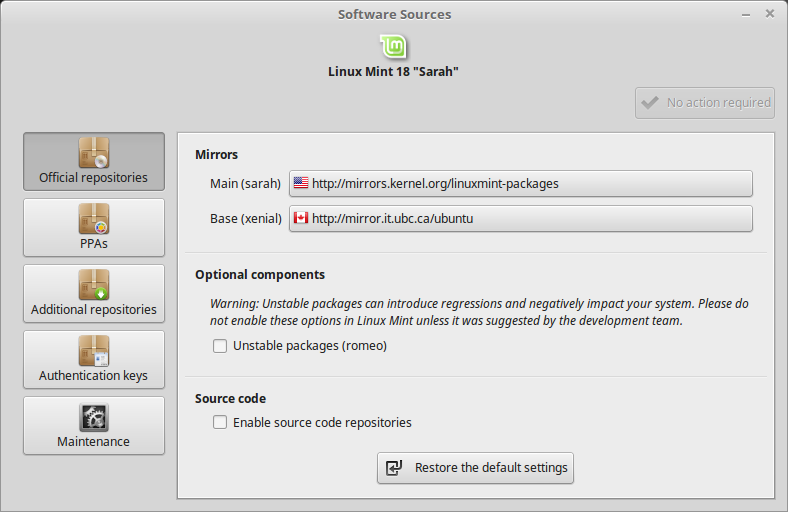
By choosing servers that
are physically closer to you, the downloads will be significantly faster. From the
Seattle area, the best choices for Linux Mint 18 (at the time of this writing) are
http://mirrors.kernel.org/linuxmint-packages for the Main repositories and
http://mirror.it.ubc.ca/ubuntu for the Base repositories.
When you click on the buttons, all of the repositories will be tested for their
bandwidth speed. You should select the fastest one. If you are in an area other than
Seattle, you may want to choose a different mirror that is closer to you.
- In the terminal window type:
sudo apt-get update
This will update the repository information which is used to keep track of which versions of the
software packages are currently installed and what is the latest version in the repositories.
- In the terminal window type:
sudo apt-get upgrade
This will make sure that you are running the latest version of all of the software that is installed on the system. It will download and install the software.
If you just want to download the software (and install later), use the -d switch
sudo apt-get -d upgrade
Now when you want to do the actual install, invoke it without the -d switch and it will install the updates.
Depending on how out-of-date your system is (i.e. how often you update things), you may end up downloading and installing hundreds of megabytes of updates.
If during the upgrade you see something like this:
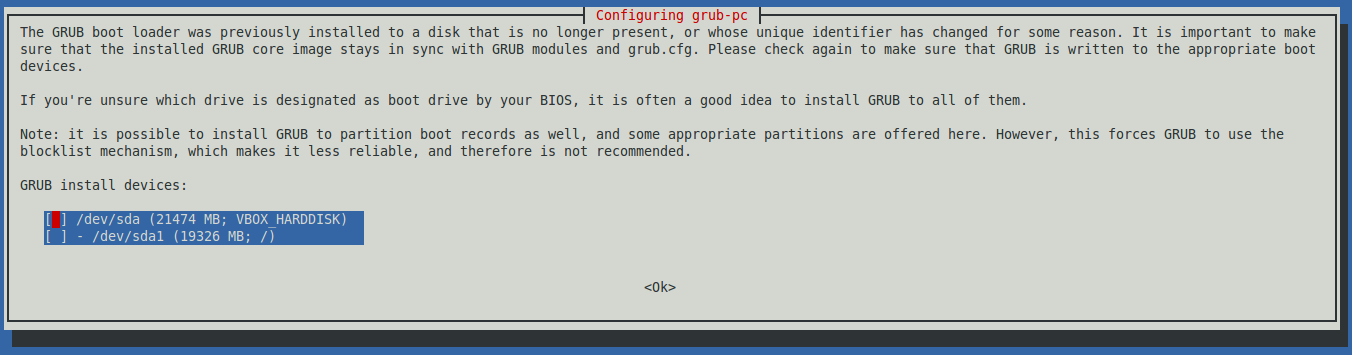
Select the first option (press the spacebar), then press TAB to move to the <Ok>
and press Enter. This message is something that I've only occasionally seen.
If the upgrade fails and you see a bunch of this kind of output:
... many more lines above like these:

dpkg: error processing package libglib2.0-0:i386 (--configure):
 dependency problems - leaving triggers unprocessed
dpkg: dependency problems prevent processing triggers for libglib2.0-0:i386:
 libglib2.0-0:i386 depends on libmount1 (>= 2.28); however:
  Package libmount1:i386 is not configured yet.
 libglib2.0-0:i386 depends on zlib1g (>= 1:1.2.2); however:
  Package zlib1g:i386 is not configured yet.

dpkg: error processing package libglib2.0-0:i386 (--configure):
 dependency problems - leaving triggers unprocessed
dpkg: too many errors, stopping
Errors were encountered while processing:
 libglib2.0-0:i386
 libglib2.0-0:i386
 libglib2.0-0:i386
 libglib2.0-0:i386
 libglib2.0-0:i386

 ... many more lines like above

Processing was halted because of too many errors.
E: Sub-process /usr/bin/dpkg returned an error code (1)
then you should run:
sudo dpkg --configure -a
to fix the problems and then re-run the upgrade command.
Other things you may want to do soon after installing Linux:
- Install KDE - This is the K Desktop Environment. It's different than the default Cinnamon desktop.
Some people like it better, some people hate it. You decide. (It's not available in newer versions greater than 17, however.)
To download it, type this in a terminal:
sudo apt-get install kde-full
It will download a lot of software and take up an additional 1 GB of drive space. The choice between the GNOME desktop
the Cinnamon desktop, and the KDE desktop (among others) is
one of personal preference. I've always preferred KDE because it is more configurable and powerful. Students new to computers (either Windows or Linux) sometimes
feel overwhelmed by the amount of options KDE provides. There will be things I demonstrate that will be much easier for you to do, if you have KDE installed.
Even if you don't want to use the KDE desktop, you might still want to install this because it provides much more than just the desktop environment.
It will install many graphical programs that you might want to explore.
If you downloaded the Cinnamon version, you may want to install some other things before using it. In addition to the update and upgrade steps above
(which should be done with any new installation), you might also want to add these packages to give you a much better Linux desktop experience:
| Command (single line) | Description |
|---|
|
sudo apt-get install mint-meta-codecs
|
Add codecs (for playing music and watching videos). Adds about 200 MBs of files.
If you got the full Cinnamon version, you will already have these. If you got the smaller
download without the codecs, then this will install them.
|
|
sudo apt-get install mint-meta-mate
|
Installs the MATE desktop. A popular desktop among the
GNOME community. Adds about 500 MBs of files. MATE on wikipedia.
|
|
sudo apt-get install mint-meta-gnome-dvd
|
Installs all of GNOME from the DVD version. Adds about 1 GB of files.
GNOME on wikipedia.
This is no longer available with versions later than 17.x.
|
|
sudo apt-get install kde-full
|
Installs everything from the KDE version (and then some).
Adds about 1.2 GBs of files. KDE on wikipedia.
This is no longer available with versions later than 17.x. If you'd still like to run Konqueror,
install these files: konqueror dolphin4 konsole konsole4-kpart kfind
|
|
sudo apt-get install mint-meta-xfce
|
Installs the Xfce desktop environment.
This is a more lightweight desktop interface that
doesn't consume as many resources (i.e. uses less CPU and memory).
Xfce on wikipedia.
|
This section now has it's own detailed page here.
Once you get the guest OS installed, one of the things that many people want to do is to be able to access files on the host from the guest, e.g. access their Windows
files from Linux.
Having the guest OS access the files on the host OS is a very powerful and convenient capability. It's not hard to do, but, if you don't know how to do it,
it may seem a little confusing at first. These notes should give you enough information to setup shared folders in your virtual machine.
Note: In these examples, the host operating system is Windows 7 Professional 64-bit and the guest is Linux Mint 12 64-bit. The Virtual Box software looks very similar
on all platforms, but you may detect some differences from the screen shots below.
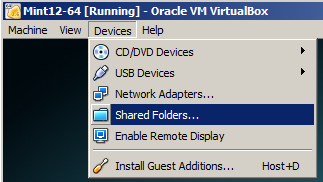
We would like the host and guest operating systems to be able to share files. We can do this by using Shared Folders.
In the running virtual machine, choose the Devices menu, then choose Shared Folders:
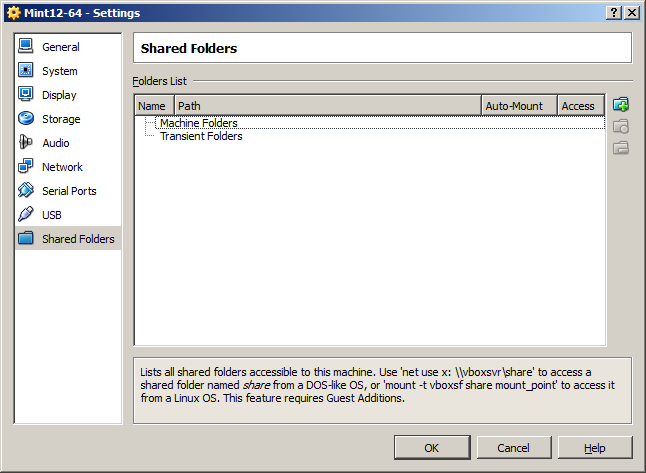
This presents the Shared Folders dialog box:
You add a shared folder by clicking on the folder icon (with the '+' sign) or pressing the insert key.
This presents the Add Share dialog box:
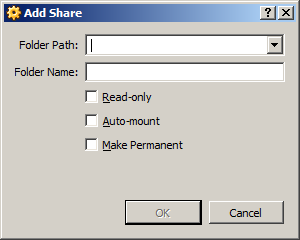
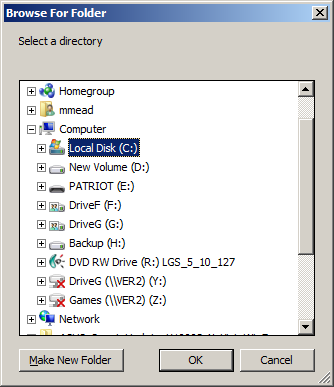
If you know the path of the folder on the host OS that you want to access from the guest OS, you can type it in or browse for it:
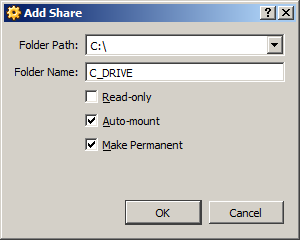
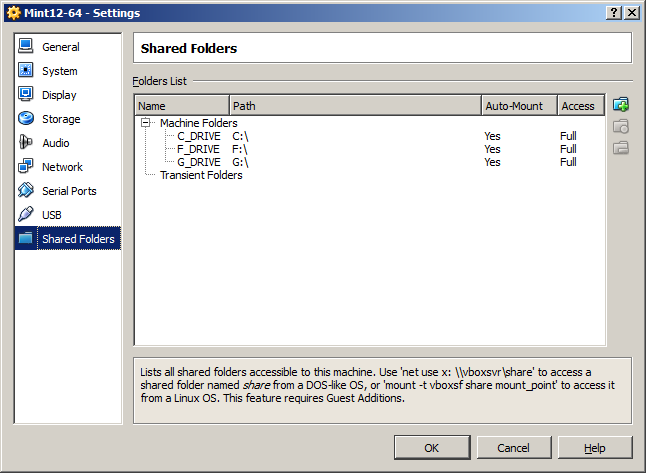
I've selected to share the entire C: drive in Windows. When you click OK, you have a chance to name the share. By default, it is named C_DRIVE which
is adequate for our purposes. I also check Auto-mount and Make Permanent for ease-of-use, as I want this to happen automatically each time the
guest OS is booted.
Clicking OK returns us to this screen where we can see that we've successfully set up a share:
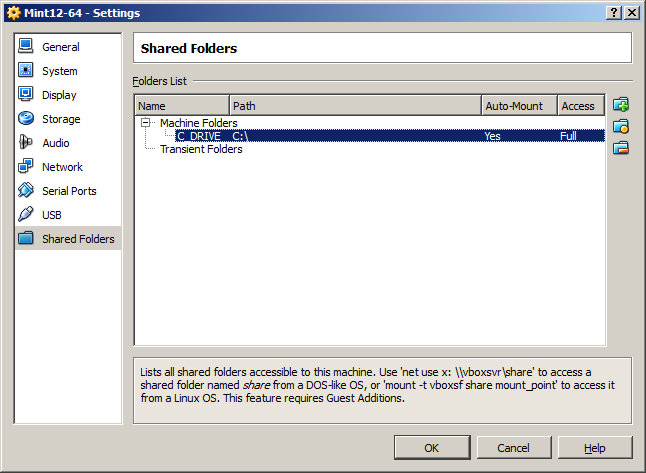
I also added my F: and G: drives as well, giving me this as a result:
You could have more control over which folder or folders to share, but when I set up my VM's, I tend to share everything because I never know what I'm going to want
to access on the host OS. For more safety, you could just share specific folders, but I tend to be lazy with non-critical systems.
By default, when you boot into your Linux guest, you will see these shared folders mounted in /media as:
/media/sf_C_DRIVE
/media/sf_F_DRIVE
/media/sf_G_DRIVE
You will not be able to access the folders, though, because you do not have the proper permission to do that. If you look at the permissions of the shared folders, e.g:
ls -l /media
You will see this:
drwxrwx--- 1 root vboxsf 0 2012-05-11 12:17 sf_C_DRIVE
drwxrwx--- 1 root vboxsf 0 2012-05-11 12:17 sf_F_DRIVE
drwxrwx--- 1 root vboxsf 0 2012-05-11 12:17 sf_G_DRIVE
The folders are owned by root and the group is vboxsf. Since, by default, no one is in the vboxsf group, you need
to add yourself (username) to the group. To see what groups you are a member of, just use the groups command and you will see something like this
displayed:
mmead adm dialout cdrom plugdev lpadmin admin sambashare
There is no vboxsf group listed. You can easily add a user to any group with the usermod command.
My username is mmead in this virtual machine, so I would do this at the command prompt:
sudo usermod -a -G vboxsf mmead
You have to log out and then log back in (just like a "regular" computer) for the new group to take affect.
(If you do this: su - $USER, the new group will only be in effect temporarily until you log out and log in again.)
Now when I type groups at the command prompt, I see this:
mmead adm dialout cdrom plugdev lpadmin admin vboxsf sambashare
Note that you must be administrator (root in Linux) to perform this task. The sudosudo
command gives you root access temporarily and will prompt you for your password.
For most users, using the default mount locations and mount names is fine. But, if you want more control over the shared folder process, you can
mount the folders the "Linux way". In the following example, I'm going to mount the shared folders in my home directory on Linux, essentially preventing
any other users from accessing these folders.
In the Linux guest operating system, we need to mountmount
these shares using the mountmount command. In this example, I will show the steps involved.
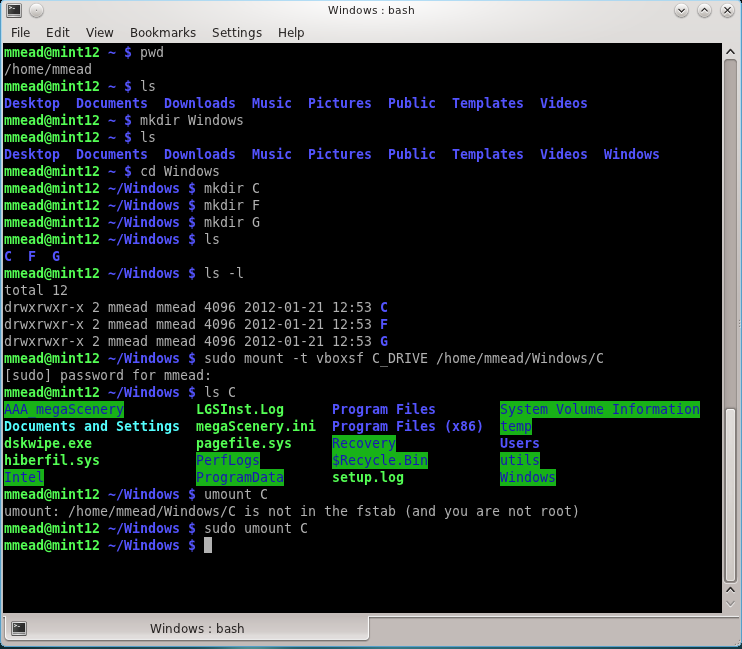
- Determine where on the guest operating system you want to mount the share. It can be an existing directory (folder) or you can create a new one.
We will create three directories, one for each share (C_DRIVE, F_DRIVE, and G_DRIVE).
In my home directory (/home/mmead) I created a directory
called Windows and within that directory, I create 3 directories: C, F, and G. These names correspond to the 3 drives
that I've shared from Windows. Sometimes, having single-letter names for directories can lead to confusion, but in this case, it makes sense since Windows
wants to name partitions with a single-letter. Using the same name for the directory as the drive letter, it is clear what is what.
Within my home directory, I run these commands:
mkdirmkdir Windows
cdcd Windows
mkdir C
mkdir F
mkdir G
Now I am ready to mount (map) the shares in Windows (e.g. C_DRIVE) to a directory in Linux (e.g. /home/mmead/Windows/C). Note that this isn't
required in a Windows guest.
- Mount the shares. This is done (not surprisingly) with the mount command. This command requires root privileges, so we will have to use
sudosudo to accomplish this task.
sudo mount -t vboxsf C_DRIVE /home/mmead/Windows/C
If you enter this correctly, you will be prompted for your user password. Type your password and the command will execute. The command is a little cryptic,
so let me give you a brief explanation. This is the basic syntax:
mount -t [filesystem type] [share name] [mount point]
where
- filesystem type - The type of file system. In this case, vboxsf is virtual box shared folder.
- share name - The name of the share that we assigned in the host OS (Windows).
- mount point - The directory in the guest OS that we are mapping (mounting) the share to.
We will need to do this for each share:
sudo mount -t vboxsf C_DRIVE /home/mmead/Windows/C
sudo mount -t vboxsf F_DRIVE /home/mmead/Windows/F
sudo mount -t vboxsf G_DRIVE /home/mmead/Windows/G
The screen shot below shows the sequence of commands (plus a few others for clarity):
See the man pages (e.g. man mkdir) for detailed information.
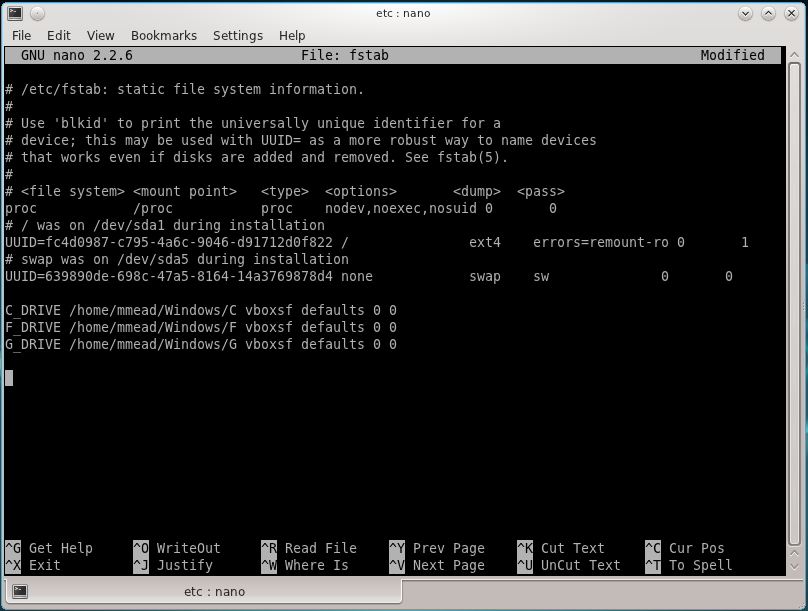
- Of course, we don't want to have to type this mount command every time we boot the system. And, of course, we don't have to. We just need to tell
the system to mount these directories at start-up. We do so by adding similar commands to a file called fstabfstab in the directory /etc. fstab
is short for file system table. Add these lines to the end of /etc/fstab:
C_DRIVE /home/mmead/Windows/C vboxsf defaults 0 0
F_DRIVE /home/mmead/Windows/F vboxsf defaults 0 0
G_DRIVE /home/mmead/Windows/G vboxsf defaults 0 0
Now, every time the guest OS boots, the Windows shares will be mounted. The screen shot below shows the actual fstab file on the guest OS:
See the man pages for fstab for explanations.
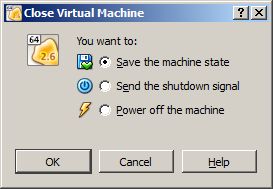
When you want to close the guest OS, you can choose how to do so. Usually, you will want to Save the machine state. This will "freeze" the virtual machine in
its current state. When you restart it later, it will be in this exact state. If you Power off the machine that is like pulling the plug on the computer. Nothing
will be saved and you could damage the virtual machine (e.g. by corrupting the hard drive of the virtual machine).
Additional references:
