Introduction
As you can imagine, building a software project from the source code is going to be more complicated than installing pre-built software. There are many reasons why you would want to build the software yourself, and some are more obvious than others. To build software, you need to make sure that:
This example will show you the details of downloading source code from the repository,
building the project, and installing it into the system. Along the way, issues such as
dependencies will be tackled.
Downloading/Installing Software
The preferred way to install software is from the official repositories using apt-get. If you know the name of the package/software you want to install, you can just run the command. Often, if you try to run a program that is in the repositories, but is NOT installed, you will be instructed how to install it.
For example, a good program to have is called htop. If htop is not installed and you try to run it, you will see this:
So, to install it, you simply do what it says and type:The program 'htop' is currently not installed. You can install it by typing: sudo apt-get install htop
and you'll see something like this:sudo apt-get install htop
Now, just type htop and you're all set. You can install other packages that you need such as doxygen, g++, valgrind, etc.Reading package lists... Done Building dependency tree Reading state information... Done The following NEW packages will be installed: htop 0 upgraded, 1 newly installed, 0 to remove and 379 not upgraded. Need to get 68.0 kB of archives. After this operation, 188 kB of additional disk space will be used. Get:1 http://archive.ubuntu.com/ubuntu/ trusty/universe htop amd64 1.0.2-3 [68.0 kB] Fetched 68.0 kB in 0s (209 kB/s) Selecting previously unselected package htop. (Reading database ... 238332 files and directories currently installed.) Preparing to unpack .../htop_1.0.2-3_amd64.deb ... Unpacking htop (1.0.2-3) ... Processing triggers for mime-support (3.54ubuntu1.1) ... Processing triggers for gnome-menus (3.10.1-0ubuntu2) ... Processing triggers for desktop-file-utils (0.22-1ubuntu1) ... Processing triggers for man-db (2.6.7.1-1ubuntu1) ... Setting up htop (1.0.2-3) ...
However, sometimes you want to install software that isn't in the repositories. You may have downloaded it from some website.
There are several ways to "install" software that isn't in the repositories. The method used will depend on what kind of file(s) you are trying to install. Linux Mint is based on Ubuntu and Ubuntu is based on Debian. Debian has its own package format and the files are generally referred to as DEB (or deb) files because they have a .deb extension.
A .deb file is a package and you can kind of think of it as an archive (like a .zip file). There is a command called dpkg (Debian Package Manager) that you use to unpack and install a Debian package. The simplest form is:
So, for example, to install the Atom text editor, you would first download the .deb file (e.g. atom-amd64.deb) from the Atom website. Then, use dpkg to install it:dpkg -i package_name
Since you're installing it into the system, you must use sudo. The output on my computer looks like this:sudo dpkg -i atom-amd64.deb
Now, from the command line (or GUI), type:Selecting previously unselected package atom. (Reading database ... 235182 files and directories currently installed.) Preparing to unpack atom-amd64.deb ... Unpacking atom (1.7.3) ... Setting up atom (1.7.3) ... Processing triggers for mime-support (3.54ubuntu1.1) ... Processing triggers for gnome-menus (3.10.1-0ubuntu2) ... Processing triggers for desktop-file-utils (0.22-1ubuntu1) ...
atomand it will run. To have it open a file, provide that on the command line as well:
atom somefile.txt
Because most software on Linux is free and open source, you may not get a pre-built binary package. You may actually get the source code and you'll have to compile it yourself. This is generally trivial as there is a makefile that is included that will do the work for you.
Example: Let's pretend that htop wasn't in the repositories, so we couldn't install it using our simple command:
If it's not in the repository, you'll see an error message like this:sudo apt-get install htop
Let's say we downloaded an archive of the source code from its website and that the archive is named htop-1.0.2.tar.gz, which is a compressed tar file. The details about tar (tape archive) files are not important. You can't just think that a compressed tar file is like a .zip file. This is a very common archive format in the Linux world. If you want to practice this example, you can download the archive here: htop-1.0.2.tar.gz. It may be outdated by the time you read this, in which case you can just get the latest version from the downloads area here: http://hisham.hm/htop/.E: Unable to locate package htop
The first thing to do is to create a new directory on your system (preferably in your home directory somewhere) and put the archive there. I'm going to assume that you have a source directory in your home directory and the file is there. So, for user jdoe, the path would be /home/jdoe/source. To extract the files from the archive, use this command: (Consult the man pages: man tar or type tar --help for information on the options.)
This will create a directory named htop-1.0.2 and place all of the files in that directory. Change into that directory and you'll see about 100 files, mostly .c and .h files. There are 2 files that you may need to look at: README and INSTALL. These files tell you how to build the program. 99% of the time, there are 3 commands you need to run:tar xzvf htop-1.0.2.tar.gz
./configure
make
sudo make install
If the configure script fails due to missing dependencies, read section #4 below which explains how to handle that situation. Most of the explanation below pertains to this technique, as well.
Hot tip: When building with make, you can specify how many files to compile at the same time. If you have multiple cores on your CPU (and you probably do), this can dramatically speed up the build process. Just specify the -j option with the number of concurrent files to compile. For example, make -j4 will compile 4 files simultaneously. If you're not sure how many cores you have, you can just run the nproc command and it will tell you. Better yet, just run make like this:
make -j`nproc`
(those are backticks surrounding nproc) and it will match the number of cores to the number of simultaneous compiles. On my computer, running make without -j takes about 4.5 seconds. With -j`nproc` it takes about 1.2 seconds. Running nproc on my computer shows the value 8.
Now, you should be able to just type htop and it will run. Easy, peasy, lemon squeezy!
I said that you will use this process 99% of the time to install from source. However, not all programs follow this standard procedure. In that case, reading the README and INSTALL files is important because it will explain what you have to do. Explaining all of those possibilities is beyond the scope of this small example.
Preparing the System
Most projects in Linux are written in the C programming language. Some may be written in C++, Java, Python, and other languages. This example will use htop as the target, which is written in C (C99, to be exact). I'm also going to use Linux Mint 17.3 as the system, although other Debian-based distributions will be very similar.Most distributions, including Mint, will have the GNU gcc compiler installed by default. If it's not installed, you can simply install it:
If you think you're going to be compiling C++ source code, you can also install that, while you're at it:sudo apt-get install gcc
Most distributions are 64-bit, but if you need to build 32-bit software, install these as well:sudo apt-get install g++
Since we are going to be downloading the source code from the Mint/Ubuntu repositories, we're going to need a couple of other packages to help us. When you download the source from the repository, you may not just get C files. It's likely that you will get a tar archive, which is like a zip file of C files. You may also get a set of patches, which are modifications made to the base set of source files. This really won't concern you, because the system will take care of creating directories and extracting the source code for you.sudo apt-get install gcc-multilib sudo apt-get install g++-multilib
In order for the system to be able to extract the source files and patch them, you'll need another tool installed (which likely isn't installed by default). That package is the dpkg-dev tool. To install it:
Output:sudo apt-get install dpkg-dev
In the output above, I highlighted the debian-keyring package that was suggested. We will also want to install this. This is kind of a security feature that will ensure that the downloaded source code really is the official source code and not some Trojan malware that may have replaced the actual source code.Reading package lists... Done Building dependency tree Reading state information... Done The following extra packages will be installed: libdpkg-perl Suggested packages: debian-keyring Recommended packages: build-essential libalgorithm-merge-perl The following NEW packages will be installed: dpkg-dev The following packages will be upgraded: libdpkg-perl 1 upgraded, 1 newly installed, 0 to remove and 280 not upgraded. Need to get 905 kB of archives. After this operation, 1,674 kB of additional disk space will be used. Do you want to continue? [Y/n] Get:1 http://archive.ubuntu.com/ubuntu/ trusty-updates/main libdpkg-perl all 1.17.5ubuntu5.6 [179 kB] Get:2 http://archive.ubuntu.com/ubuntu/ trusty-updates/main dpkg-dev all 1.17.5ubuntu5.6 [726 kB] Fetched 905 kB in 0s (1,027 kB/s) (Reading database ... 163230 files and directories currently installed.) Preparing to unpack .../libdpkg-perl_1.17.5ubuntu5.6_all.deb ... Unpacking libdpkg-perl (1.17.5ubuntu5.6) over (1.17.5ubuntu5.4) ... Selecting previously unselected package dpkg-dev. Preparing to unpack .../dpkg-dev_1.17.5ubuntu5.6_all.deb ... Unpacking dpkg-dev (1.17.5ubuntu5.6) ... Processing triggers for man-db (2.6.7.1-1ubuntu1) ... Setting up libdpkg-perl (1.17.5ubuntu5.6) ... Setting up dpkg-dev (1.17.5ubuntu5.6) ...
If you're curious, more information about the keyring can be found here:
Output:sudo apt-get install debian-keyring
Reading package lists... Done
Building dependency tree
Reading state information... Done
The following NEW packages will be installed:
  debian-keyring
0 upgraded, 1 newly installed, 0 to remove and 280 not upgraded.
Need to get 48.7 MB of archives.
After this operation, 55.6 MB of additional disk space will be used.
Get:1 http://archive.ubuntu.com/ubuntu/ trusty/universe debian-keyring all 2014.03.03 [48.7 MB]
Fetched 48.7 MB in 6s (7,345 kB/s)
Selecting previously unselected package debian-keyring.
(Reading database ... 163469 files and directories currently installed.)
Preparing to unpack .../debian-keyring_2014.03.03_all.deb ...
Unpacking debian-keyring (2014.03.03) ...
Setting up debian-keyring (2014.03.03) ...
At this point, we're ready to start downloading the actual source code that we want to build.Note #1: When you execute the command: apt-get source htop and you see warnings along the lines of "Can't check signature..." or "...failed to verify signature...", install the debian keyring:
sudo apt-get install debian-keyring
Dowloading the Source Code (from the Repositories)
Downloading the source code from the repositories is trivial. Before downloading, though, make a new directory for the source code. You DO NOT want to download to your normal Downloads directory because you may end up with thousands of source files polluting that directory. I'm just going to create a directory called source in my home directory and use that.Once you're in the source directory, you can download, extract, and patch the source code. We use apt-get, as usual, but instead of install, we specify source:
You'll notice that I didn't use sudo. This is simply because I'm putting it (the source code) in my home directory, so I don't need special permissions to do so. This is the output from the command above:apt-get source htop
You can see we got an error, and it tells us what the problem is: We need to put some source URIs in the sources.list file. Duh.Reading package lists... Done Building dependency tree Reading state information... Done E: You must put some 'source' URIs in your sources.list
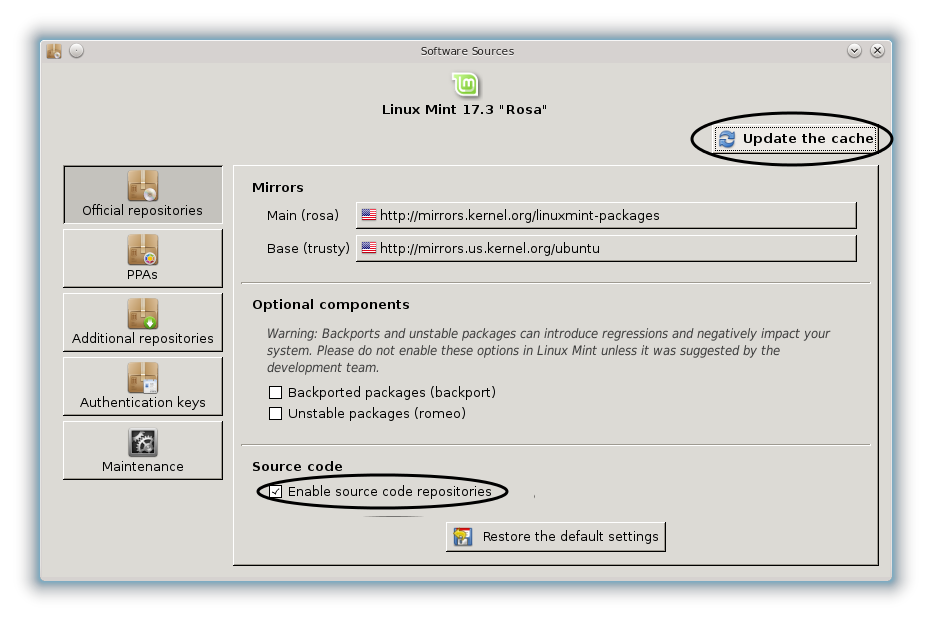
Note: If you get an error saying: E: Unable to find a source package for htop or E: You must put some 'source' URIs in your sources.list, it means that you haven't configured apt-get to download the sources. There are many ways to enable the sources, and each distribution has its own way. For this, since I'm primarily talking about Linux Mint, I'm going to use the GUI. This is the most straight-forward way for people new to building from source.
From the command line, run mintsources. Make sure the checkbox named Enable source code repositories is checked, then click on the button labeled Update the cache. Now, you should be able to download the source files from the repositories using the command shown above.
See the screenshot below for guidance.
Now, rerun the command:Adding the source repositories from the command line is a much more involved task because you have to know a exactly which distribution (version) you're running. The GUI knows all of this stuff. If you're running another Debian-based distribution, you can run a GUI program called synaptic. Then go to Settings | Repositories and you should be able to find an option that will let you enable the source code repositories.
And you should see something like this:apt-get source htop
The output shows that:Reading package lists... Done Building dependency tree Reading state information... Done Need to get 400 kB of source archives. Get:1 http://archive.ubuntu.com/ubuntu/ trusty/universe htop 1.0.2-3 (dsc) [1,137 B] Get:2 http://archive.ubuntu.com/ubuntu/ trusty/universe htop 1.0.2-3 (tar) [388 kB] Get:3 http://archive.ubuntu.com/ubuntu/ trusty/universe htop 1.0.2-3 (diff) [10.8 kB] Fetched 400 kB in 0s (547 kB/s) dpkg-source: info: extracting htop in htop-1.0.2 dpkg-source: info: unpacking htop_1.0.2.orig.tar.gz dpkg-source: info: applying htop_1.0.2-3.diff.gz
You can see the original archive is dated Dec 2, 2012 and the diff is dated Oct 21, 2013, which was the last time it was modified. Only the changes were provided, most likely because only a few lines of code have changed. This is common in the open source world.total 400 drwxr-xr-x 5 mmead mmead 4096 May 19 17:44 htop-1.0.2 -rw-r--r-- 1 mmead mmead 10829 Oct 21 2013 htop_1.0.2-3.diff.gz -rw-r--r-- 1 mmead mmead 1137 Oct 21 2013 htop_1.0.2-3.dsc -rw-r--r-- 1 mmead mmead 388499 Dec 2 2012 htop_1.0.2.orig.tar.gz
The diff program is used to determine which lines of code have changed. It can also provide more details that show how the lines were changed. This information, coupled with another program called patch, makes it very easy to just send the changes (or patches) to users so they can upgrade their software without having to re-download possibly tens of thousands of lines of (unchanged) code they already have.
If you're interested, you can read more about the details here: Comparing and Merging Files with GNU diff and patch. (Online copy here.)
Okay, now we're ready to build the software.
Building the Program
This is the long listing:ls -l configure INSTALL README
-rwxr-xr-x 1 mmead mmead 436739 Oct  3  2012 configure
-rw-r--r-- 1 mmead mmead   9240 Aug 26  2011 INSTALL
-rw-r--r-- 1 mmead mmead   1942 Aug 26  2011 README
The simplest way to compile this package is:

  1. `cd' to the directory containing the package's source code and type
     `./configure' to configure the package for your system.  If you're
     using `csh' on an old version of System V, you might need to type
     `sh ./configure' instead to prevent `csh' from trying to execute
     `configure' itself.

     Running `configure' takes awhile.  While running, it prints some
     messages telling which features it is checking for.

  2. Type `make' to compile the package.

  3. Optionally, type `make check' to run any self-tests that come with
     the package.

  4. Type `make install' to install the programs and any data files and
     documentation.

  5. You can remove the program binaries and object files from the
     source code directory by typing `make clean'.  To also remove the
     files that `configure' created (so you can compile the package for
     a different kind of computer), type `make distclean'.  There is
     also a `make maintainer-clean' target, but that is intended mainly
     for the package's developers.  If you use it, you may have to get
     all sorts of other programs in order to regenerate files that came
     with the distribution.
./configure
make
sudo make install
to install it and then re-run configure. This is quite common and isn't really a big deal in Linux.sudo apt-get install <missing-package>
Ok, running:Note: I'm using a freshly installed Linux Mint 17.3 (rosa) with the Cinnamon desktop. I ran sudo apt-get update and sudo apt-get upgrade immediately after the installation to ensure my system was up-to-date.
Depending on which version of Mint (or any Linux distribution, for that matter) and which desktop you're using, you may have more or less of the required packages installed. This means you may have to install packages that aren't listed here. However, the process will be the same, meaning, whatever configure complains is missing, you'll need to install those packages.
will print out many lines of code. We're only going to be interested in the last few lines, which are going to indicate the problem. Here's the output immediately after I run ./configure:./configure
The first line checks to see if gcc is installed, and it is. The second line checks to see if it works, which it doesn't. There's very little information about why it doesn't work, but it's a pretty common problem. Without going into all of the details and reasons why this doesn't work, suffice it to say that you need a few other development packages installed if you're going to develop (build) software on the system. There's a package called build-essential that contains the basic programs to build software. We just need to install that:checking for gcc... gcc checking whether the C compiler works... no configure: error: in `/home/mmead/source/htop-1.0.2': configure: error: C compiler cannot create executables See `config.log' for more details.
And this is what it says is going to be installed:sudo apt-get install build-essential
You can see that it's going to install the g++ compiler and some other libraries. This problem is very common on a new installation of Linux. In fact, if you were to write a simple "Hello, world!" program in C:Reading package lists... Done Building dependency tree Reading state information... Done The following extra packages will be installed: g++ g++-4.8 libc-dev-bin libc6-dev libstdc++-4.8-dev Suggested packages: g++-multilib g++-4.8-multilib gcc-4.8-doc libstdc++6-4.8-dbg glibc-doc libstdc++-4.8-doc The following NEW packages will be installed: build-essential g++ g++-4.8 libc-dev-bin libc6-dev libstdc++-4.8-dev 0 upgraded, 6 newly installed, 0 to remove and 1 not upgraded. Need to get 21.2 MB of archives. After this operation, 52.9 MB of additional disk space will be used. Do you want to continue? [Y/n]
#include <stdio.h>

int main(void)
{
  printf("Hello, world!\n");
  return 0;
}
You would see this:gcc hello.c
hello.c:1:19: fatal error: stdio.h: No such file or directory
 #include <stdio.h>
                   ^
compilation terminated.
OK, so now we run configure again to see if we need anything else:
This will output about 100 lines, and at the end you may see this error:./configure
It can't find the ncurses library, which htop requires. So, we simply install it:checking for refresh in -lncursesw... no configure: error: You may want to use --disable-unicode or install libncursesw.
sudo apt-get install libncursesw.
Once the ncurses library is installed, re-run configure, and at the end of the output is this error:Notice the period at the end. That is part of the name! (Yeah, that took me a while to figure out!)
We need to install another ncurses package. The first one was for unicode, and this is for ASCII. This header file is in a package named libncurses5-dev. Install it:configure: error: missing headers: curses.h
and re-run configure. About another 100 lines of code will be displayed. However, this time, there will be no errors! This means that we can finally actually build the program. One interesting side-note: If you look at the last few lines of output, you will see this line:sudo apt-get install libncurses5-dev
This is one of the main purposes of configure: It creates Makefile, which is a 1500 line makefile! Now, just type makeconfig.status: creating Makefile
and, after about 5 seconds, the program will be built. We can see the executable by typing:make
and this is what we see:ls -l htop
It's about a 650,000 byte executable which we can now run:-rwxr-xr-x 1 mmead mmead 652548 May 19 21:43 htop
Now we have the htop program built from the source code we downloaded from the repository../htop
Installing the Software on the System
We have to use sudo now because we need to copy the executable to /usr/bin (most likely), as well as installing the man pages for the program and possibly a bunch of other files. This will make all of the files and documention available from anywhere on the system by any user. If you already have version 1.0.2 of htop installed, you really don't have to do this as this was just an example of how to install from the source code from the repository. But, if you downloaded a newer version and you want to replace the older version, you would want to over write it. Also, some users prefer to build all of the software themselves and build it with specific optimizations for their particular hardware.sudo make install
Because this was the first time we built software for our newly installed Linux Mint system, we had to install a bunch of other packages first. As you build more and more packages, you'll have to install less and less dependencies because they will already be on the system. If we had built several other packages before attempting to build htop, we would likely have only needed to do this:
That would have done everything and we wouldn't have had to keep installing missing dependencies. This is why it is so trivial to build and install software on Linux. Trying to do this on "other operating systems" can be a total nightmare!apt-get source htop cd htop-1.0.2 ./configure make make install
Miscellany
I'll have to admit, there was a little hand-waving going on above. Where exactly? Look at this error message when we ran configure:Then, I went on to say that we need to install another ncurses package. This header file is in a package named libncurses5-dev. That's correct, but how did I know which package contained curses.h? If I would have just done this:configure: error: missing headers: curses.h
It may have appeared to install it, but it didn't. Also, depending on what you have already installed on your system, you may get this error instead:sudo apt-get install curses.h
This says you're missing the ncurses library, not the header file. Either way, you need to install the same package:checking for refresh in -lncurses... no checking for curses.h... (cached) no configure: error: missing libraries: libncurses
But, again, how did I know which package to install? There are several ways to find out, and I'm going to show you one method. It's a program called apt-file. First, you have to install it:sudo apt-get install libncurses5-dev
It will install a bunch of files and at the end you'll see something like this:sudo apt-get install apt-file
This tells us to update the cache:The system-wide cache is empty. You may want to run 'apt-file update' as root to update the cache. You can also run 'apt-file update' as normal user to use a cache in the user's home directory. Processing triggers for libc-bin (2.19-0ubuntu6.7) ...
This could take a few minutes, and when it's done you'll see something like this:sudo apt-file update
Downloading complete file http://packages.linuxmint.com/dists/rosa/Contents-amd64.gz
  % Total    % Received % Xferd  Average Speed   Time    Time     Time  Current
                                 Dload  Upload   Total   Spent    Left  Speed
100  238k  100  238k    0     0   582k      0 --:--:-- --:--:-- --:--:--  584k
Downloading complete file http://extra.linuxmint.com/dists/rosa/Contents-amd64.gz
  % Total    % Received % Xferd  Average Speed   Time    Time     Time  Current
                                 Dload  Upload   Total   Spent    Left  Speed
100 17766  100 17766    0     0  88763      0 --:--:-- --:--:-- --:--:-- 88830
Downloading complete file http://archive.ubuntu.com/ubuntu/dists/trusty/Contents-amd64.gz
  % Total    % Received % Xferd  Average Speed   Time    Time     Time  Current
                                 Dload  Upload   Total   Spent    Left  Speed
100 28.0M  100 28.0M    0     0   885k      0  0:00:32  0:00:32 --:--:-- 5016k
Downloading complete file http://archive.ubuntu.com/ubuntu/dists/trusty-updates/Contents-amd64.gz
  % Total    % Received % Xferd  Average Speed   Time    Time     Time  Current
                                 Dload  Upload   Total   Spent    Left  Speed
100 27.4M  100 27.4M    0     0  1153k      0  0:00:24  0:00:24 --:--:-- 1333k
Downloading complete file http://security.ubuntu.com/ubuntu/dists/trusty-security/Contents-amd64.gz
  % Total    % Received % Xferd  Average Speed   Time    Time     Time  Current
                                 Dload  Upload   Total   Spent    Left  Speed
100 24.8M  100 24.8M    0     0  5507k      0  0:00:04  0:00:04 --:--:-- 6575k
Ignoring source without Contents File:
  http://archive.canonical.com/ubuntu/dists/trusty/Contents-amd64.gz
The output looks like this:apt-file search curses.h
I've highlighted the package that we need to install.autoconf-archive: /usr/share/doc/autoconf-archive/html/ax_005fwith_005fcurses.html doc-linux-ja-html: /usr/share/doc/HOWTO/ja-html/LFS-BOOK/appendixa/ncurses.html doc-linux-ja-html: /usr/share/doc/HOWTO/ja-html/LFS-BOOK/chapter05/ncurses.html doc-linux-ja-html: /usr/share/doc/HOWTO/ja-html/LFS-BOOK/chapter06/ncurses.html ekg2-core: /usr/share/doc/ekg2-core/book-en/plugin-ncurses.html ekg2-core: /usr/share/doc/ekg2-core/book-pl/plugin-ncurses.html latrace: /etc/latrace.d/headers/ncurses.h libghc-hscurses-doc: /usr/lib/ghc-doc/haddock/hscurses-1.4.1.2/hscurses.haddock libghc-ncurses-doc: /usr/lib/ghc-doc/haddock/ncurses-0.2.1/ncurses.haddock libncurses5-dev: /usr/include/curses.h libncurses5-dev: /usr/include/ncurses.h libncursesw5-dev: /usr/include/ncursesw/curses.h libncursesw5-dev: /usr/include/ncursesw/ncurses.h libpython2.7-dbg: /usr/include/python2.7_d/py_curses.h libpython2.7-dev: /usr/include/python2.7/py_curses.h libpython3.4-dbg: /usr/include/python3.4dm/py_curses.h libpython3.4-dev: /usr/include/python3.4m/py_curses.h libslang2-dev: /usr/include/slcurses.h lua-curses-dev: /usr/include/lua5.1/lua-curses.h lua-curses-dev: /usr/include/lua5.2/lua-curses.h lua-curses-dev: /usr/share/doc/lua-curses-dev/curses.html php-doc: /usr/share/doc/php-doc/html/book.ncurses.html php-doc: /usr/share/doc/php-doc/html/intro.ncurses.html php-doc: /usr/share/doc/php-doc/html/ref.ncurses.html pypy-doc: /usr/share/doc/pypy-doc/html/config/objspace.usemodules._minimal_curses.html python2.7-doc: /usr/share/doc/python2.7/html/howto/curses.html python2.7-doc: /usr/share/doc/python2.7/html/library/curses.html python3.4-doc: /usr/share/doc/python3.4/html/howto/curses.html python3.4-doc: /usr/share/doc/python3.4/html/library/curses.html
Sometimes you'll see a lot of output and you have to try and figure out which package you need. If you know exactly where the header file belongs (/usr/include/curses.h), then you can search for this:
and it will display this:apt-file search /usr/include/curses.h
Which tells you definitively what package you need. As a rule-of-thumb, when you are missing header files or libraries, they are likely going to be in a package that starts with lib, and ends with -dev. This tells you it's in a library package, and it's a development package (i.e. it's for building software, not just simply running software.) You'll also see -doc (documentation) packages and -dbg, which are debug packages (to help you find bugs in programs).libncurses5-dev: /usr/include/curses.h
Additional References
More information can be found here. Just Google for much more information on each tool. Some tools are lower level (e.g. dpkg) and others are higher level (e.g. Synaptic).