| Core Information | Miscellaneous | |
|---|---|---|
Introduction
Because networks are ubiquitous (local-area networks, the Internet, etc.), it makes sense that we would want to access one computer (remote) from another (local). There are many ways to accomplish this, but the defacto standard for years has been through the secure shell, or SSH protocol.Before SSH, a program called telnet was used. It was simple and popular, but it had no security. SSH is similar to telnet, but with added security, as well as other features:
telnet still has its uses (debugging network applications for one), but because of it's lack of security, it shouldn't be used for day-to-day computer access over the Internet.
There are two parts to SSH: the client and the server.
Installing the SSH Client and SSH Server
The version of SSH that many Linux distributions use is OpenSSH.Installing the Client
Chances are, the SSH client is already installed on your computer. In the case that it isn't, it's a simple matter of installing it:
sudo apt-get install openssh-client
If you don't ever plan on connecting to your computer from another computer, then you don't have to install the SSH server. The client is all you need to connect to other computers. However, if you are planning on connecting to your computer remotely (from other computers on the network or Internet), then you will need to install an SSH server.
If you type this at a terminal prompt:
and you see this:ssh localhost
it's likely that you don't have an SSH server installed. Installing the server is straight-forward and is installed like any other software:ssh: connect to host localhost port 22: Connection refused
sudo apt-get install openssh-server
To test your server after installation:
ssh localhost
You will probably see something like this:
mmead@nadia ~ $ ssh localhost The authenticity of host 'localhost (127.0.0.1)' can't be established. ECDSA key fingerprint is 0d:d5:fb:64:4a:8e:e5:38:1c:59:30:c1:9c:c3:39:cf. Are you sure you want to continue connecting (yes/no)? yes Warning: Permanently added 'localhost' (ECDSA) to the list of known hosts. mmead@localhost's password: (not shown) Welcome to Linux Mint 14 Nadia (GNU/Linux 3.5.0-17-generic x86_64) Welcome to Linux Mint * Documentation: http://www.linuxmint.com mmead@nadia ~ $
The first time that you connect to a computer via SSH, you will be asked to verify the authenticity. If you're sure that the computer you're connecting to is really the one you want to connect to, type yes at the prompt. (In this example, it is the local machine, so we are sure.) We'll discuss the details about this later.
If you see something like the above, then the SSH client and server have been installed and are functioning properly.To logout of the SSH session that you've just created, simply type exit at the prompt and the session will be closed.
mmead@nadia ~ $ exit logout Connection to localhost closed. mmead@nadia ~ $
Using the SSH Client
Now that you have an SSH client installed and ready to go, let's connect to some computers.In order for you to connect to a remote computer, the following conditions must be met on the remote computer:
SSH has many options, and we'll just look at a few. The simplest form of the command is
where host is the name (or IP address) of the computer you want to connect to. In this example, I'm connecting to another Linux computer (sabrina) on my internal network:ssh host
mmead@nadia ~ $ ssh sabrina The authenticity of host 'sabrina (192.168.1.17)' can't be established. RSA key fingerprint is a3:36:3b:08:c1:f6:53:1f:cd:86:7a:80:8a:fd:26:ab. Are you sure you want to continue connecting (yes/no)? yes Warning: Permanently added 'sabrina' (RSA) to the list of known hosts. mmead@sabrina's password: (not shown) Last login: Sat Jan 19 15:05:38 2013 from olga Logged in at sabrina. mmead@sabrina:~>
If your username on the remote computer is the same as your username on the local computer, you don't have to specify it when you use the SSH client. However, if the usernames are different on the two computers, you must specify it. This is why I try to have the same username on all computers.
Specifying the usernameYou can use the -l (lowercase 'L') option with your username:
or provide your username with the @ symbol prepended to the host name (somewhat like an email address):ssh -l username host
Example, logging into sabrina as chico. (Yeah, it's been a while!)ssh username@host
mmead@nadia ~ $ ssh chico@sabrina chico@sabrina's password: (not shown) Last login: Thu Dec 27 12:19:02 2007 from athena Logged in at sabrina. chico@sabrina:~>
Connecting to a different portIf the SSH server is running on a different port than the standard (port 22), you must specify this when connecting:
Assuming that the SSH server is running on port 12345 instead of (or in addition to) port 22:ssh -p port host
mmead@nadia ~ $ ssh -l chico -p 12345 sabrina chico@sabrina's password: (not shown) Last login: Sat Jan 19 15:20:22 2013 from olga Logged in at sabrina. chico@sabrina:~>
You can jump from computer to computer using SSH. From the SSH session above on sabrina (on my local network), I can login to another computer on the network (olga) and then jump to another one out on the Internet (jason.intel.com):chico@sabrina:~> ssh -l mmead olga mmead@olga's password: (not shown) Welcome to Linux Mint 13 Maya (GNU/Linux 3.2.0-23-generic x86_64) Welcome to Linux Mint * Documentation: http://www.linuxmint.com 75 packages can be updated. 0 updates are security updates. *** /dev/md2 will be checked for errors at next reboot *** *** /dev/md3 will be checked for errors at next reboot *** *** /dev/sdb1 will be checked for errors at next reboot *** *** /dev/sda1 will be checked for errors at next reboot *** Last login: Thu Jan 17 10:20:01 2013 from www4.gmail.net mmead@olga:/home/mmead> ssh jason.intel.com mmead@jason.intel.com password: (not shown) Linux jason 2.6.31-22-server #73-Ubuntu SMP Fri Feb 11 20:20:46 UTC 2011 x86_64 To access official Ubuntu documentation, please visit: http://help.ubuntu.com/ System information as of Sat Jan 19 15:30:43 PST 2013 System load: 0.08 Processes: 86 Usage of /: 52.0% of 4.65GB Users logged in: 1 Memory usage: 12% IP address for eth0: 214.114.42.67 Swap usage: 1% IP address for eth1: 10.1.21.67 Graph this data and manage this system at https://landscape.canonical.com/ Last login: Sun Jan 13 11:12:14 2013 from c-37-13-214-17.sea.wa.pps.net mmead@jason:~
To return to a previous computer, just type exit at the prompt:mmead@jason:~ exit logout Connection to jason.intel.com closed. mmead@olga:/home/mmead>exit logout Connection to olga closed. chico@sabrina:~> exit logout Connection to sabrina closed. mmead@nadia ~ $
Now I'm back at the original computer (nadia) on my local network.In case you were wondering why the default prompt in the terminal window includes the username and host name (e.g. chico@sabrina), it's to help the user identify who she is logged in as and on what computer. With the ease that SSH allows one to connect to other computers, sometimes you can get confused as to who you are logged in as or on which computer.
On some computers, I use a different color for the prompt, which helps me recognize at a glance where I am. For example:mmead@olga:/> mmead@athena:/home/mmead> mmead@jessica:~> mmead@lisa ~ $
Information about configuring the SSH client is here.Configuring the Server
The default configuration for the server will usually work right out-of-the-box. However, you may want to enable/disable some settings to make it a little more secure. The configuration file for the server is generally found here:You have to use sudo when you edit the file. The file is a simple text file (like almost all configuration files on Unix) so it is easy to modify. Most of the settings require a simple yes or no following it. For example, if you want the ability to run graphical programs (GUIs), you need to enable that like this:/etc/ssh/sshd_config
These are some of the simpler and more useful settings to modify:X11Forwarding yes
The man page for the configuration file gives you more details about each setting. Just type:
Setting Description Example Specifies the port number that the server listens on. The default is 22. Multiple options of this type are permitted (i.e. the server can listen on multiple ports.) There is one Port command for each port as the example shows.
Port 12345Specifies whether root can log in using ssh. The default is yes. Specifies the maximum number of concurrent unauthenticated connections to the server. Additional connections will be dropped until authentication succeeds or the LoginGraceTime expires for a connection. The default is 10. Specifies the protocol versions the server supports. The possible values are 1 and 2. Multiple versions must be comma-separated. The default is 2. This keyword can be followed by a list of user name patterns, separated by spaces. If specified, login is allowed only for user names that match one of the patterns. Only user names are valid; a numerical user ID is not recognized. By default, login is allowed for all users.
in a console to read about them. Other useful settings:man sshd_config
More information about the server configuration file is here.
Setting Description Example Allows the client to run GUI programs over SSH. The client must connect to the server using the -X option. The default is no. Enabling this may potentially be a security risk, so you wouldn't want to do this on a production server. However, most "production servers" don't have any graphical environment, so this is pointless on those servers. Also, running GUI programs over the Internet can be painfully slow, therefore, this option is generally used on private secured LANs where the bandwidth is sufficient. From the man page:
X11 forwarding should be enabled with caution. Users with the ability to bypass file permissions on the remote host (for the user's X authorization database) can access the local X11 display through the forwarded connection. An attacker may then be able to perform activities such as keystroke monitoring.For this reason, X11 forwarding is subjected to X11 SECURITY extension restrictions by default. Please refer to the ssh -Y option and the ForwardX11Trusted directive in ssh_config(5) for more information.
Tunneling
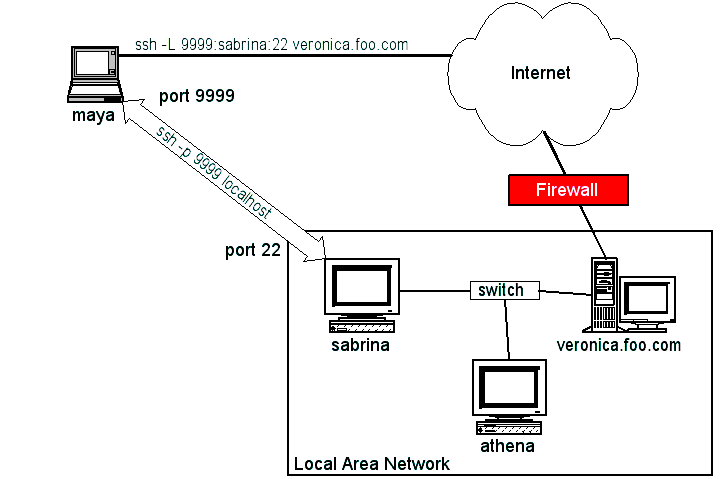
There are several reasons why one might want to setup an SSH tunnel, and one reason is to access a computer that is not accessible from your client.A typical scenario is that you have several computers on your local area network, but only one of them (a public computer) has a connection to an outside network (e.g. the Internet). With SSH tunneling, you could setup a "connection" from the Internet to a private computer (not on the Internet) via the public computer that is connected to the Internet.
Another scenario is that you have several computers that are behind a firewall. For security reasons, only one of the computers allows incoming SSH connections. (It's easier to secure one computer than many computers.) All of the computers behind the firewall can access the Internet for outgoing connections, but not for incoming connections.
This is the scenario:
Assuming that the client is our laptop, maya. The command is simple, you just need the -L option like so:
and results in this:ssh -L 9999:sabrina:22 veronica.foo.com
The general form of the option is:ssh -p 25000 -L 9999:sabrina:35000 veronica.foo.com
where:-L [bind_address:]port:host:hostport
Specifies that the given port on the local (client) host is to be forwarded to the given host and port on the remote side. This works by allocating a socket to listen to port on the local side, optionally bound to the specified bind_address. Whenever a connection is made to this port, the connection is forwarded over the secure channel, and a connection is made to host port hostport from the remote machine. Port forwardings can also be specified in the configuration file. IPv6 addresses can be specified by enclosing the address in square brackets. Only the superuser can forward privileged ports. By default, the local port is bound in accordance with the GatewayPorts setting. However, an explicit bind_address may be used to bind the connection to a specific address. The bind_address of "localhost" indicates that the listening port be bound for local use only, while an empty address or '*' indicates that the port should be available from all interfaces.
That's all there is to it! Of course, the next question is, how do I access sabrina from maya now? Simple, since maya:9999 is connected (tunneled) to sabrina:22, you just specify the port when using SSH from maya:This command tells SSH to connect to port 9999 on the local computer (localhost). Since there is a tunnel from localhost:9999 to sabrina:22, this essentially connects you to sabrina.ssh -p 9999 localhost
Also realize that the -L option for tunneling doesn't actually do any SSH login from maya to sabrina. It simply creates the tunnel. After that, it's up to you to make use of the tunnel, which normally means you would connect to localhost on that tunneled port like the command above shows.
Additional notes:
Now, just point a browser at http://localhost:9998/ and you'll see the main page from sabrina displayed.ssh -L 9998:sabrina:8000 veronica.foo.com
SSH Keys
Up until now, every time we want to connect to an SSH server, we have to type in a password. There are two problems with this:In short:The technical details behind SSH keys is a very big topic based on public-key cryptographypublic-key cryptography and challenge-response authenticationchallenge-response authentication and is outside the scope of this short tutorial. I am just going to give you the basics so you can get up and running with them. I encourage interested students to read about these topics to get a full understanding of the techniques.
Generating the keys
The first thing that needs to be done is to generate this public/private key pair. You do that with a program called ssh-keygen.
mmead@nadia ~ $ ssh-keygen -t dsa Generating public/private dsa key pair. Enter file in which to save the key (/home/mmead/.ssh/id_dsa): [Press enter] Enter passphrase (empty for no passphrase): [Press enter] Enter same passphrase again: [Press enter] Your identification has been saved in /home/mmead/.ssh/id_dsa. Your public key has been saved in /home/mmead/.ssh/id_dsa.pub. The key fingerprint is: 3d:4a:07:29:26:4d:0a:a4:db:ac:9c:c6:06:f7:51:25 mmead@nadia The key's randomart image is: +--[ DSA 1024]----+ | .o E . | | . . + o . | |. o = o | | + + . o | |o + . S + | |+o.. . . o . | |.* . . | |o | | | +-----------------+ mmead@nadia ~ $
Notes about the key generation:The private key in id_dsa:
The public key in id_dsa.pub:-----BEGIN DSA PRIVATE KEY----- MIIBuwIBAAKBgQCmSEqipvaW4LdPTw0nQ88+1afEZ+7jSrhLL48naC8zzj9NQGus QFITWtcbt+6M2MOs6DZlkMYuHsXTE60BwIO/Uy3slozx2ngBh4nyVnYJF2ALubT5 DqQ8Oc0xJVGYCOQb+tEua1+3s5gahZ70IQHpF5D5LP9ubaA/RGJLWM075wIVAIVQ /ZjgwLrhUW/hOteA+BHIfxM1AoGBAIU4IvsHOZ/zDBj8/gLYVFYzPLLTYm/C2BeI V4JvMAygJ3WmqwHBmVF90wa784g4rqEhOF2weBpW4s+v1GViFyn2YsusZHiRLKOZ owxaZougVWMFoPpIdqW0Rf32DKea94FOqGhO96ROr5DHtT7BhXk9XrTTQyEctOtH W4nVtVZdAoGAYK7sx0T9p3c9FjCHgHTVkC7THvXeROCS0NPBYpq/wUFh+0r0SqQx IlTJ3PPHNtCV9q/cNuJ1n1ki1MAHKbwxrbp6Bb3s76cTEGu0TeSccRpD+nB8aSWX RGSzU0AXGNKAFC/1u0k0BoLIjsaJA0zcDa/SKmNkqwl7yXGgEfdaN6gCFDCuTLFc WPbji5D1YSkJby76Z/3p -----END DSA PRIVATE KEY-----
The private key spans multiple lines in the file. The public key, though, is not broken into mulitple lines like this, but is one single line in the file. I wrapped the line so it would fit on the web page without having to scroll horizontally. Also, you would NEVER display your private key like this, but this is just a sample that I generated, not a "real" one! Each time you run the ssh-keygen program, a unique set of keys are generated.ssh-dss AAAAB3NzaC1kc3MAAACBAKZISqKm9pbgt09PDSdDzz7Vp8Rn7uNKuEsvjydoLzPOP01Aa6x AUhNa1xu37ozYw6zoNmWQxi4exdMTrQHAg79TLeyWjPHaeAGHifJWdgkXYAu5tPkOpDw5zTElUZgI5B v60S5rX7ezmBqFnvQhAekXkPks/25toD9EYktYzTvnAAAAFQCFUP2Y4MC64VFv4TrXgPgRyH8TNQAAA IEAhTgi+wc5n/MMGPz+AthUVjM8stNib8LYF4hXgm8wDKAndaarAcGZUX3TBrvziDiuoSE4XbB4Glbi z6/UZWIXKfZiy6xkeJEso5mjDFpmi6BVYwWg+kh2pbRF/fYMp5r3gU6oaE73pE6vkMe1PsGFeT1etNN DIRy060dbidW1Vl0AAACAYK7sx0T9p3c9FjCHgHTVkC7THvXeROCS0NPBYpq/wUFh+0r0SqQxIlTJ3P PHNtCV9q/cNuJ1n1ki1MAHKbwxrbp6Bb3s76cTEGu0TeSccRpD+nB8aSWXRGSzU0AXGNKAFC/1u0k0B oLIjsaJA0zcDa/SKmNkqwl7yXGgEfdaN6g= user@athena
Installing the public key
Now that you have your keys, you need to install the public key onto the servers that you want to access remotely. Once installed, you no longer are required to type in a password to connect from you local machine. This is done with another program called ssh-copy-id and it works like this:
The output from the above command:ssh-copy-id -i ~/.ssh/id_dsa.pub username@remote-server.net
All this command really does is to append the public key to the end of a file named authorized_keys (or authorized_keys2) in your .ssh/ directory on the remote computer.Now try logging into the machine, with "ssh 'remote-server.net'", and check in: ~/.ssh/authorized_keys to make sure we haven't added extra keys that you weren't expecting.
And that's it. You can now connect to the remote SSH server without having to type in a password.
Notes:
ssh-copy-id "user@host -p 12345"
cat id_dsa.pub >> .ssh/authorized_keys
PasswordAuthentication no
ChallengeResponseAuthentication no
Miscellaneous
Using a hosts file.In the examples above, I used computer names (e.g. sabrina) instead of its IP address (192.168.6.123). Humans are not really good at memorizing lots of numbers like this so we give an IP address an alias.
IP Address Hostname Aliases
127.0.0.1         localhost             maria
210.154.66.1      mail.foo.com          mail
210.154.66.2      www.foo.com           www
192.168.6.123     sabrina
192.168.6.124     athena
207.45.188.34     jason.intel.com       jason
207.45.188.77     home.terabyte.com     home
127.0.0.1         localhost             maria
210.154.66.1      mail
210.154.66.2      www
192.168.6.123     sabrina
192.168.6.124     athena
207.45.188.34     jason
207.45.188.77     home
and it will fill in the rest:ssh at<TAB>
Pretty sweet!ssh athena
More information is here. (Side note: I've never had to restart the network after modifying the /etc/hosts file.) Hosts files are not unique to Unix-like operating systems. They are used on other operating systemother operating system as well.
TCP wrappers is the name given to the technique by which you can allow or deny specific computers from accessing your servers. By using TCP wrappers, you can allow access from only a few computers while denying access from every other computer (in the world!) Essentially,
When a computer attempts to connect to the server, the two files are consulted. First, the hosts.allow file is checked, and if nothing is found, the hosts.deny file is checked. If nothing is found there, the computer is allowed to continue with the connection.
The simplest way to use these files is to deny every computer access in the hosts.deny file, and then selectively add computers to the hosts.allow file. The basic syntax of the files is:
where services are programs (servers/daemons) that are listening for incoming connections and clients are the names or IP addresses of computers. (Note this is just a basic introduction to using these files. Consult the man pages for all of the details about the full syntax of the files.)services : clients
Here's an example for adding a little more security to our SSH server:
which means that all computers are denied access to our SSH server (sshd). ALL is a wildcard that means, well, all computers.sshd : ALL
which means that only veronica.foo.com can access the SSH server. Any other computer will be denied access. The other computers won't even get the chance to type in a username and password because they are denied any contact with the SSH server at all.sshd : veronica.foo.com
Of course, I could have put all of these on one line:# Allow all computers on the LAN access (192.168.1.1 through 192.168.1.254) sshd : 192.168.1.* # Allow access from a few "friendly" computers sshd : sirius.usc.edu sshd : jason.intel.com sshd : home.terabyte.com # Servers that I use a lot from my ISPs sshd : server1.myisp.net sshd : 67.103.44.161
But that makes it difficult to read. I prefer to put them on separate lines, grouping related computers together. I also like to put a comment before the rule, especially if I use an IP address because there is no name associated.sshd : 192.168.1.*, sirius.usc.edu, jason.intel.com, home.terabyte.com, server.myisp.net
To really lock down your server, put this in hosts.deny:
This will deny ALL computers access to ALL services. Your server is now useless as no one will be able to connect! Of course, then you must allow clients in hosts.allow:ALL : ALL
This means for:sshd : 192.168.1.* sshd : .usc.edu telnetd : lisa.foo.com httpd : ALL ftpd : 192.168.1.*, 192.168.2.*
Sometimes, you just want to run a command on the remote computer and you don't need a login to a shell. For example, you just want to find out some information about the computer such as how long it's been running, how many users are logged in, and the current load on the machine. There is a command called uptime and it generates all of this information.
This will log you in, run the uptime command (sending the output back to your console), and then log you out. Nice!ssh veronica uptime
ssh --help
usage: ssh [-1246AaCfgKkMNnqsTtVvXxYy] [-b bind_address] [-c cipher_spec]
           [-D [bind_address:]port] [-e escape_char] [-F configfile]
           [-I pkcs11] [-i identity_file]
           [-L [bind_address:]port:host:hostport]
           [-l login_name] [-m mac_spec] [-O ctl_cmd] [-o option] [-p port]
           [-R [bind_address:]port:host:hostport] [-S ctl_path]
           [-W host:port] [-w local_tun[:remote_tun]]
           [user@]hostname [command]
Output:ssh venus.foobar.com df -h
Multiple commands separated by semicolons and enclosed in quotes:Filesystem Size Used Avail Use% Mounted on /dev/sda1 4.7G 3.6G 911M 80% / udev 261M 120K 261M 1% /dev none 261M 0 261M 0% /dev/shm none 261M 68K 261M 1% /var/run none 261M 0 261M 0% /var/lock none 261M 0 261M 0% /lib/init/rw mfs-data:1272 15T 707G 14T 5% /srv/mnt/www mfs-data:1272 20T 5.4T 14T 29% /srv/mnt/videos mfs-data:1272 19T 5.0T 14T 27% /srv/mnt/arch mfs-data:1272 17T 2.7T 14T 17% /srv/mnt/files
Output:ssh veronica "uptime ; df -h ; w"
I added the color so you could see which output belongs with which of the 3 commands.09:48:17 up 36 days, 19:20, 16 users, load average: 0.68, 0.67, 0.60 Filesystem Size Used Avail Use% Mounted on /dev/sda1 39G 7.5G 30G 21% / udev 7.8G 68K 7.8G 1% /dev tmpfs 3.1G 1.2M 3.1G 1% /run none 5.0M 0 5.0M 0% /run/lock none 7.8G 2.0M 7.8G 1% /run/shm /dev/sda6 500G 61G 414G 13% /data /dev/sda5 98G 16G 77G 18% /home 09:48:17 up 36 days, 19:20, 16 users, load average: 0.68, 0.67, 0.60 USER TTY FROM LOGIN@ IDLE JCPU PCPU WHAT mmead pts/0 :0 17Mar13 3days 0.24s 0.24s /bin/bash mmead pts/1 :0 17Mar13 3days 0.38s 0.38s /bin/bash mmead pts/2 :0 17Mar13 3days 1.09s 0.20s /bin/bash mmead pts/3 :0 17Mar13 9days 0.00s 22:32 kdeinit4: kded4 mmead pts/4 olga 17Mar13 2days 0.74s 0.74s -bash mmead pts/6 :0 Sat15 3days 0.73s 0.18s /bin/bash mmead pts/5 olga Sat14 3days 0.30s 0.30s -bash mmead pts/7 olga 15Mar13 2days 0.74s 0.74s -bash mmead pts/8 olga 15Mar13 2days 1.54s 0.02s sshd: mmead [pr mmead pts/9 sabrina 16Mar13 3days 0.71s 0.02s sshd: mmead [pr mmead pts/11 :0 Sat16 2days 0.39s 0.39s /bin/bash mmead pts/12 sabrina Sat16 3days 0.19s 0.19s -bash mmead pts/13 sabrina Sat16 3days 0.46s 0.02s sshd: mmead [pr mmead pts/14 :0 Sun07 2days 0.55s 0.55s /bin/bash mmead pts/15 :0 Sun07 2days 1.04s 1.04s /bin/bash mmead pts/18 olga Tue15 2:26m 0.23s 0.23s -bash
WARNING: REMOTE HOST IDENTIFICATION HAS CHANGED!
If you attempt to connect to an SSH server and you see this scary message:
it means something has changed since you've last connected. Things that could be happening:@@@@@@@@@@@@@@@@@@@@@@@@@@@@@@@@@@@@@@@@@@@@@@@@@@@@@@@@@@@ @ WARNING: REMOTE HOST IDENTIFICATION HAS CHANGED! @ @@@@@@@@@@@@@@@@@@@@@@@@@@@@@@@@@@@@@@@@@@@@@@@@@@@@@@@@@@@ IT IS POSSIBLE THAT SOMEONE IS DOING SOMETHING NASTY! Someone could be eavesdropping on you right now (man-in-the-middle attack)! It is also possible that a host key has just been changed. The fingerprint for the RSA key sent by the remote host is e6:36:3b:07:c1:f6:13:0f:ce:86:aa:82:8a:da:56:b6. Please contact your system administrator. Add correct host key in /home/user/.ssh/known_hosts to get rid of this message. Offending ECDSA key in /home/user/.ssh/known_hosts:47 remove with: ssh-keygen -f "/home/user/.ssh/known_hosts" -R www.server.com RSA host key for www.server.com has changed and you have requested strict checking. Host key verification failed.
If you recall the message we received when we first connected to our server, we got a message from the SSH client asking if we are sure that the computer we're connecting to is the correct one:
I replied yes and the client said it had added the server to the list of known hosts. That file is actually called known_hosts and it's in your .ssh/ subdirectory in your home directory. Each time you connect to a known server (one you've added to the known_hosts file), the SSH client checks the corresponding signature in the known_hosts file to verify that you are really connecting to the server you think you are. If the signatures don't match, you will see that message.The authenticity of host 'localhost (127.0.0.1)' can't be established. ECDSA key fingerprint is 0d:d5:fb:64:4a:8e:e5:38:1c:59:30:c1:9c:c3:39:cf. Are you sure you want to continue connecting (yes/no)? yes Warning: Permanently added 'localhost' (ECDSA) to the list of known hosts.
If you're sure that no one is trying to intercept your connection, then you can update the known_hosts file. The solution is also mentioned in the scary message:
This is saying that line 47 in file /home/user/.ssh/known_hosts is in conflict. You need to delete that line. You can simply open it up in a text editor, go to line 47, delete the line, and then save the file. (You own this file, so you don't need to use sudo to edit the file.) Or, you can have the ssh-keygen program do it for you by using the command suggested by the SSH client:Offending ECDSA key in /home/user/.ssh/known_hosts:47 remove with: ssh-keygen -f "/home/user/.ssh/known_hosts" -R www.server.com
I always edit the text file myself, but you can choose your preference. After the line has been removed from the file, re-issue the SSH command. You will be prompted again to accept the connection just as if it were the first time you've connected to that server. Accepting the connection will update the known_hosts file with the updated information. You can change the way the SSH client warns about this by modifying the StrictHostKeyChecking setting in the configuration file for the client (/etc/ssh/ssh_config or ~/.ssh/config). From the man page for ssh_configssh-keygen -f "/home/user/.ssh/known_hosts" -R www.server.com
StrictHostKeyChecking
If this flag is set to "yes", ssh(1) will never automatically add host keys to the ~/.ssh/known_hosts file, and refuses to connect to hosts whose host key has changed. This provides maximum protection against trojan horse attacks, though it can be annoying when the /etc/ssh/ssh_known_hosts file is poorly maintained or when connections to new hosts are frequently made. This option forces the user to manually add all new hosts. If this flag is set to "no", ssh will automatically add new host keys to the user known hosts files. If this flag is set to "ask", new host keys will be added to the user known host files only after the user has confirmed that is what they really want to do, and ssh will refuse to connect to hosts whose host key has changed. The host keys of known hosts will be verified automatically in all cases. The argument must be "yes", "no", or "ask". The default is "ask".
Mounting Remote File Systems over SSH (SSHFSSSHFS)
This is the Secure SHell File System or SSH File System. This will allow you to mount a remote directory via SSH, which means that all traffic between the local computer and the host computer is encrypted. This is a really cool way of accessing your files remotely.
On a Debian-based system, install it as such:
Note: Depending on what is already installed, you may also need to install fuse (File system in userspace).sudo apt-get install sshfs
Now you're ready to mount remote file systems over SSH. The only requirement to use SSHFS is that you must have an account on the remote system. This is not unlike SSH.
In this example, assume that
I tend to name the directories with the name of the remote computer. This makes it easy to remember where everything is mounted. Now, to mount the directory using SSHFS, simply do this:mkdir /home/alfred/sabrina
If this is the first time you've ever used SSH with the remote computer, you will see something like this:sshfs einstein@sabrina.foo.com: /home/alfred/sabrina
mmead@nadia ~ $ sshfs einstein@sabrina.foo.com: /home/alfred/sabrina The authenticity of host 'sabrina.foo.com (208.51.122.118)' can't be established. ECDSA key fingerprint is 2d:d5:fc:64:45:8f:e5:33:1c:59:30:c1:9c:c3:55:cd. Are you sure you want to continue connecting (yes/no)? yes Warning: Permanently added 'localhost' (ECDSA) to the list of known hosts. mmead@localhost's password: (not shown)
The is the same warning we received when we connected to a remote computer for the first time. Because the connection (mount) is using SSH, all of the security of SSH is in use as well.After typing your password, your home directory on the remote computer will be mounted on
You can now access all of your files from sabrina.foo.com by accessing /home/alfred/sabrina. You can use the command line or any GUI programs you wish./home/alfred/sabrina
To unmount the remote directory, use this command:
Now the remote computer is no longer mounted.fusermount -u /home/alfred/sabrina
Notes:
sshfs einstein@sabrina.foo.com: /home/alfred/sabrina -p 12345
You'll also need to setup SSH keys to do this so you don't have to type in a password. Consult the SSHFS man page for an explanation of the options.sshfs#einstein@sabrina.foo.com: /home/alfred/sabrina fuse defaults,user, uid=einstein,gid=einstein,allow_other,IdentityFile=/home/alfred/.ssh/id_dsa 0 0
and add this line to /etc/rc.local:sshfs#einstein@sabrina.foo.com: /home/alfred/sabrina fuse defaults,user,noauto, uid=einstein,gid=einstein,allow_other,IdentityFile=/home/alfred/.ssh/id_dsa 0 0
This will prevent the directory from being mounted automatically from /etc/fstab but will instead mount the directory just before the login screen is displayed. Sometimes there are problems mounting remote directories automatically at boot.mount /home/alfred/sabrina
Secure Copy (scp)
The most popular task that we perform with networked computers is copying files between them. Copying a file from one directory to another directory on the same computer is trivial, and we use the cp command:
For example:cp source destination
The command above copies the file foo.txt (that is in the directory /home/fred) to the directory /home/fred/backups. If we wanted to change the name during the copy, we would provide it with the directory:cp /home/fred/foo.txt /home/fred/backups
The command above copies the file to the same location as before, but this time it gives the file a different name (bar.txt).cp /home/fred/foo.txt /home/fred/backups/bar.txt
As one would expect with Linux (or any Unix-based OS), copying files between computers is equally trivial. Instead of using the cp command, you would use the scp (secure copy) command. The main difference between the two copy commands is that scp requires the name of the remote computer that you are copying to/from.
In the example below, I am going to copy a file named file.dat that is in my home directory on olga to another computer on my local network. This is a long listing of file.dat:
We can see that the file is a little over 106 megabytes in size. I'm going to copy it to a directory named /home/mmead/storage on veronica.mmead@olga:/home/mmead>ls -l file.dat -rw------- 1 mmead mmead 106,881,024 Mar 19 2014 file.dat
Yes, it is that simple! The output shows how long it took (2 seconds) and the speed of the transfer (51 megabytes per second). Although you can't tell from the output, the progress of the transfer was being updated every 1 second until it completed. This is nice and gives you some feedback on how long the copy is going to take.mmead@olga:/home/mmead>scp file.dat veronica:/home/mmead/storage file.dat 100% 102MB 51.0MB/s 00:02
OK, so what does this have to do with SSH?
scp is using SSH behind-the-scenes to help it accomplish its tasks. In the examples above, since my login on both computers is the same, I don't need to specify that when I use the command. Just like the ssh command, I can supply additional information, if necessary. A more verbose command to copy the files would look like this:As the name implies, this is a secure copy operation. The data that is copied is encrypted while it is being transfered over the network. This means that the remote computer must be running an SSH server. Also, you must have access to that computer (i.e. you need an account on the remote system).
In the above command, I explicity prefaced the computer name with my login and the @ (at sign) character. All of these commands do the same thing:scp file.dat mmead@veronica:/home/mmead/storage
scp file.dat mmead@veronica:/home/mmead/storage
scp file.dat veronica:/home/mmead/storage
scp file.dat veronica:~/storage
If I simply wanted to copy the file to my home directory on veronica, I could shorten the command to this:Remember, the ~ (tilde) character is shorthand for the user's home directory (e.g. /home/mmead).
or, even shorter (since my login is the same on both computers):scp file.dat mmead@veronica:
If you don't specify a directory, your home directory is implied. Notice the : (colon) at the end. It is very important! Without it, scp would simply make a copy of file.dat in the current local directory and name it mmead@veronica or veronica (which is certainly not what you want!)scp file.dat veronica:
The examples above copied a file from my local computer to a remote computer. We can do it the other way, as well. This example copies from the remote computer to my local computer:
scp veronica:/home/mmead/storage/file.dat .
You can even copy a file from two computers that are both remote. I have another computer on my local network named nina. This command below will copy a file named main.c from my home directory on veronica to my home directory on nina. I am currently logged in on olga:Remember that the . (period) at the end means "the current directory".
Pretty sweet! As long as you have accounts on the remote computers, you can copy files between them. Here's a longer command:scp veronica:main.c nina:
Here's what's going on:scp mmead@dit1234.digipen.edu:/home/mmead/tools/compile.txt mmead@fred.psu.edu:/home/mmead/storage/comp.txt
Other points:
Links