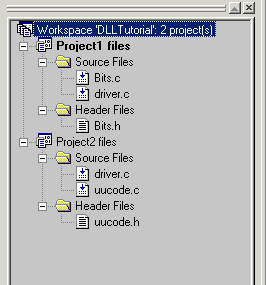
You may notice that there are a couple of default folders missing from the two projects in the Workspace window. The folders that are missing are the Resource files folders. You can simply delete those, since they are not needed. The first thing is to add a new project to the Workspace. This is done by right-clicking the mouse on the first line (workspace) in the Workspace window and choosing Add New Project to Workspace... from the context menu:
This brings up the New Project Dialog where you can select the type of project you want to create.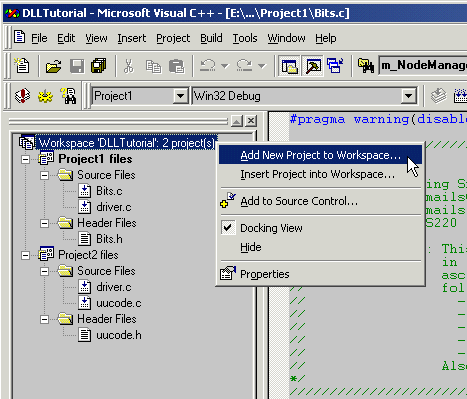
so the new project is placed here:E:\Digipen\Courses\CS220\Code\DLLTutorial\Project1 E:\Digipen\Courses\CS220\Code\DLLTutorial\Project2
E:\Digipen\Courses\CS220\Code\DLLTutorial\CS220Utils
Click the OK button to dismiss the dialog box.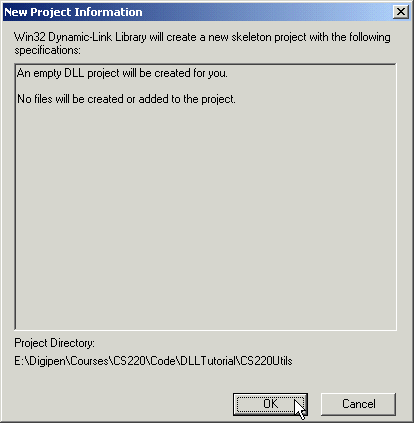
Your Workspace window should now look like this:
Now we need to add some files to the CS220Utils Project. The files already exist and are currently in Project1 and Project2. There are several ways that we can add files to a project. The technique shown below uses simple drag and drop within the Workspace window.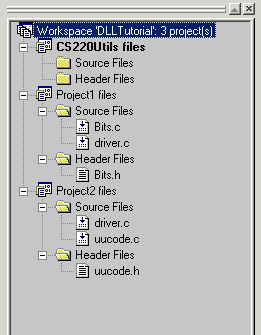
Be aware that if you simply drag and drop the files from one project to another using the LEFT mouse
button, you will actually perform a move operation, which means that you will be removing the files
from the project where the files originated. For some tasks, this may be what you want to do, but for this
task, we want the files to exist in both projects so we need to perform a copy operation.
Also note that, even though there appears to be multiple copies of each source file, there is only one
physical file on the hard disk. This is desirable because we don't want to duplicate the code, we want to
reuse it. This means that, for example, if you are working on the CS220Utils Project and you modify the
bits.c file, you are actually modify the same file that is used by Project1 as well.
If the file you wanted to add to the project wasn't part of any other project in the Workspace, you can use the "old-fashioned" way of adding files by using a browse dialog:
At this point, we could build the DLL and Visual Studio would create a valid DLL file from the two source files in the project. However, there is an additional step that we need to take in order to make the functions in the .c files accessible to clients. This step is called exporting the functions. By default, none of the functions in our .c files are accessible from outside of the DLL. The reason we need to export functions is because we may have many, many functions in our C modules, (which is typically the case), but only a few of them are meant to be called by the client. We will export only those functions that we want to make publicly accessible.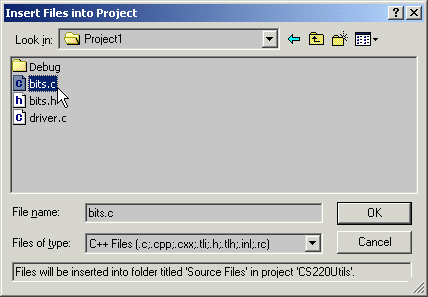
There are several ways to export functions, and we are going to use a simple technique that requires no changes to our source files. (In this tutorial our source files are bits.c and uucode.c.) To select functions to export, we need to create a Module Definition File. A module definition file is just a simple text file that has a file suffix of .DEF. The file contains a list of the functions we want to export.
For this project, create a text file named CS220Utils.def and add it to the source folder for the project.
To export all of our "public" functions from the DLL, make sure the contents of CS220Utils.def is as follows: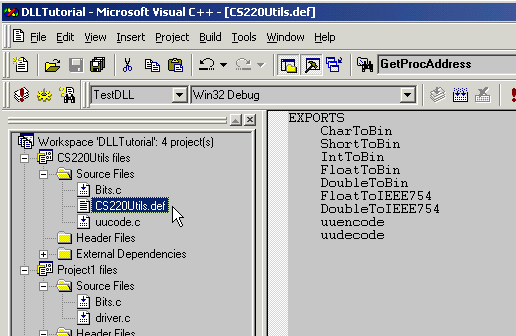
If, for example, you only wanted clients to call your uuencode function, you would simply export only that function:EXPORTS CharToBin ShortToBin IntToBin FloatToBin DoubleToBin FloatToIEEE754 DoubleToIEEE754 uuencode uudecode
That's all there is to exporting functions, at least for this simple DLL. There is a lot of other information that you can put inside the .def file, but this is the minimum. For more information on .def files, just search for "module definition files" on MSDN. At this point, we're ready to create the dynamic link library.EXPORTS uuencode
Testing the Dynamic Link Library in a Project
To test the DLL, we need to create an executable program.
// We actually need to include this because DLLs are Windows-specific
#include <windows.h>  // HINSTANCE, LoadLibrary(), GetProcAddress(), FreeLibrary()
#include <stdio.h>    // printf()

void main(void)
{
  const char *DLLName = "CS220Utils";      // Filename of the DLL that contains the function we need
  const char *FnName = "IntToBin";         // The function we want to call
  const unsigned char *(*MyIntToBin)(int); // A pointer to a function that takes an int and returns
                                           //   a pointer to a character (just like IntToBin!)
  HINSTANCE dll;  // a pointer

    // Load the DLL
  dll = LoadLibrary(DLLName);

    // If return is NULL, Windows couldn't find the DLL for us
  if (dll == NULL)
  {
    printf("Unable to load %s.\n", DLLName);
    return;
  }

    // Find the IntToBin function in the DLL. Since GetProcAddress returns
    // a pointer to an int, we need to cast it to the type of function
    // pointer we expect.
    //
    // This is also why we need to list the function in the EXPORTS section
    // of the module definition file. Failing to do so would certainly cause
    // GetProcAddress to return NULL.
  MyIntToBin = (const unsigned char *(*)(int)) GetProcAddress(dll, FnName);

    // If return is NULL, Windows can't find the function in the DLL
  if (MyIntToBin == NULL)
  {
    printf("Can't find function in DLL. Did you remember to export it?\n");
    FreeLibrary(dll); // Unload the DLL
    return;
  }

  //**********************************************************************
  // At this point, the DLL is loaded and the function has been located
  //**********************************************************************

    // Call the function and print out the bits
  printf("%s\n", MyIntToBin(127));

    // Unload the DLL
  FreeLibrary(dll);
}
If we run the TestDLL console application, this is what is displayed:
Apparently, the call to LoadLibrary failed:
  // Load the DLL
dll = LoadLibrary(DLLName);

  // If return is NULL, Windows couldn't find the DLL for us
if (dll == NULL)
{
  printf("Unable to load %s.\n", DLLName);
  return;
}
because that's where Visual Studio put TestDLL.exe when it created it. The second place Windows looks is in all of the directories that are specified in the PATH environment variable. A directory that is surely listed in the PATH variable is:E:\Digipen\Courses\CS220\Code\DLLTutorial\TestDLL\Debug
which contains hundreds (or even thousands) of DLLs. I'm not going to get into the religious debate over where you should put your DLL, but it is almost always a Bad Idea (stemming from laziness, pure and simple) to put them into \System32. So, for this example, we are going to copy the DLL into the same directory where TestDLL.exe lives:C:\WINNT\System32
Now when we run TestDLL.exe, we see what we expected to see the first time: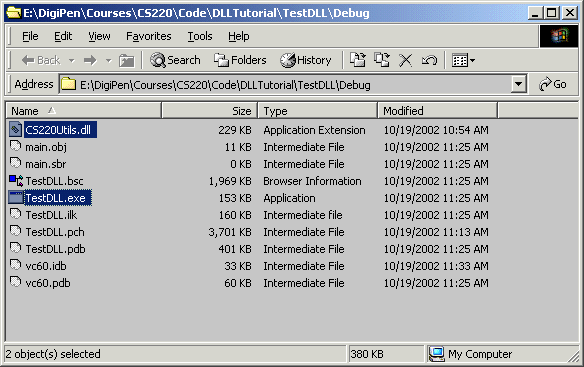
The tool that I'm going to show is a free tool from Peter Vones called PE Viewer. Windows executables are in a format known as PE, which stands for Portable Executable (although I don't know how portable they are.) Search MSDN for "portable executable format" for more information.
If you run PEViewer and open CS220Utils.dll, you'll see the following displayed:
The section that we are interested in is the Exports section. This section lists all of the functions that are accessible to outside clients. As we would expect, all of the functions we listed in the .def file are listed here. The Imports section lists all of the DLLs that are used by our DLL. In this case, there's only one: kernel32.dll, which is used by almost all windows executables.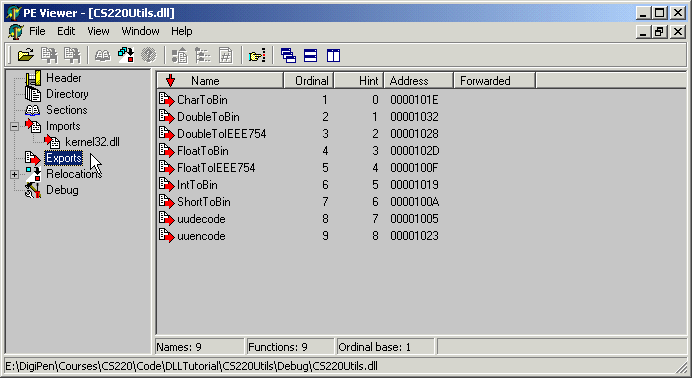
By the way, this kind of tool is invaluable when trying to determine on which DLLs your program is dependent. MS Visual Studio has a tool for listing dependent DLLs called Dependency Walker (depends.exe). You will probably find it on the Start menu (in MS Visual Studio Tools) in Windows. Or, if you don't have MS VS installed on a comptuer, Peter Vones also has a similar tool called Dependency Viewer which comes with the PE Viewer when you download it.
If you forget to export functions from your DLL (via a .def file or other means), you will not have an exports section in your DLL. GetProcAddress can't find a function unless it has been exported.