Installing the 32-bit and 64-bit C (gcc) and C++ (g++) Compilers on Windows

(These are different than the compilers included with Cygwin)

MinGW (Minimalist GNU for Windows), formerly mingw32, is a free and open source software development environment for creating Microsoft Windows applications.

Installing the 64-bit compiler
Installing the 32-bit compiler

Download the installer for MinGW from here:

MinGW Installer

The instructions on this page refer to version 7.1.0, build revision 1 of the MinGW tools. This is an older version than what we are currently using. As of September, 2019, the version that we are using is 8.1.0, build revision 0. So, if you see any screenshots below that refer to the older version, just substitute the newer version and everything should work fine.

Installing the 64-bit Version

Once you've downloaded the installer, follow the steps below to install and configure the tools.

  1. Navigate to the folder that contains the MinGW-64 installer mingw-w64-install.exe. This will probably be your Downloads folder.

  2. Run the installer. The initial screen of the installer is shown. Click Next


  3. Make sure you select exactly what is shown below. If you choose a different configuration, there is no guarantee that your compiler will work correctly, causing you to receive a 0 on your assignments. Click Next to continue.


  4. Change the destination folder to c:\mingw as shown below. What ever you do, DO NOT put any spaces in the folder names. Ever. Period. You can select Create shortcuts in Start Menu, but you will likely never use them. Click Next to continue.


  5. At this point, the installer is downloading the necessary files. Once the files have been downloaded, they will be put into the location you specified above.


  6. The installer is now extracting files from the downloaded file and placing them into the installation directory.


  7. When all of the files have been installed, you will see this dialog. Click Next to continue.


  8. If the installation was successful, you will see this final dialog. Click Finish to complete the installation.
    Done. Almost.

  9. Unfortunately, the hardest part for most students is this last step and 99% of the time that students have a problem, it is because they didn't configure their computers properly after installing the software.

    If you want to be able to use the gcc/g++ compilers from any command prompt (which you most definitely do!), you'll need to add the location of the bin folder to the path. Assuming that you have installed MinGW in c:\mingw as instructed above, you need to add:

    	 c:\mingw\mingw64\bin
    
    to the beginning of your PATH. If you don't know how to modify the PATH in Windows, you can find out how here , or ask a student that is familiar with Windows.

    When adding c:\mingw\mingw64\bin to your PATH, it MUST be the first entry in the PATH. Putting it somewhere else may cause the wrong compilers to be used (probably the compilers from the Cygwin utilities). Once you've modified your PATH, you should logout and log back in to Windows.

    When you log back in, open a command prompt. You should now be able to type gcc or g++ from any command window and get the later version of the compilers.

    To verify that you have correctly installed and configured your computer, open a command prompt and type this:

    gcc --version
    
    You should see this displayed:

    gcc (x86_64-posix-seh-rev0, Built by MinGW-W64 project) 8.1.0 Copyright (C) 2018 Free Software Foundation, Inc. This is free software; see the source for copying conditions. There is NO warranty; not even for MERCHANTABILITY or FITNESS FOR A PARTICULAR PURPOSE.

    Also, if you have already installed and configured the Cygwin utilities, if you type this at the prompt:
    which gcc
    
    You should see this:

    /cygdrive/c/mingw/mingw64/bin/gcc

    If you see this instead:

    'which' is not recognized as an internal or external command, operable program or batch file.

    it means that you have not installed the Cygwin utilities, or haven't set the PATH for Cygwin correctly.
    Note:

    For students that are less experienced working with computers (e.g. installing developer software, configuring the PATH, working from the command prompt, etc.) you may need to visit the Academic Support Center for more help. The students working there can help you ensure that your computer is configured properly. Or, you can just ask a student that is more familiar with Windows.

Installing the 32-bit Version (Optional)

It's unlikely that anyone is using a 32-bit computer these days, so it is not necessary to install this version. I'm leaving the instructions here for historical context.

You will use the same installer that you used to install the 64-bit version. However, you will choose the 32-bit version instead of the 64-bit version.
  1. Run the installer as before and click Next:


  2. Make sure you select exactly what is shown below. If you choose a different configuration, there is no guarantee that your compiler will work correctly. Basically, you want to choose the same configuration that you chose for the 64-bit version above. The most important choice is the Architecture. Choose i686. This is the 32-bit compiler. After setting the selections as shown below, click Next to continue.


  3. Change the destination folder to c:\mingw32 as shown below. What ever you do, DO NOT put any spaces in the folder names. Ever. Period. You can select Create shortcuts in Start Menu, but you will likely never use them. Click Next to continue.


  4. At this point, the installer is downloading the necessary files. Once the files have been downloaded, they will be extracted and put into the location you specified above.


  5. When all of the files have been installed, you will see this dialog. Click Next to continue.


  6. If the installation was successful, you will see this final dialog. Click Finish to complete the installation.
    Done. Again, almost.

  7. Unfortunately, just as with the 64-bit installation above, the hardest part is configuring Windows to use the compiler. If you are having problems, it is likely because you haven't set up things properly after the installation.

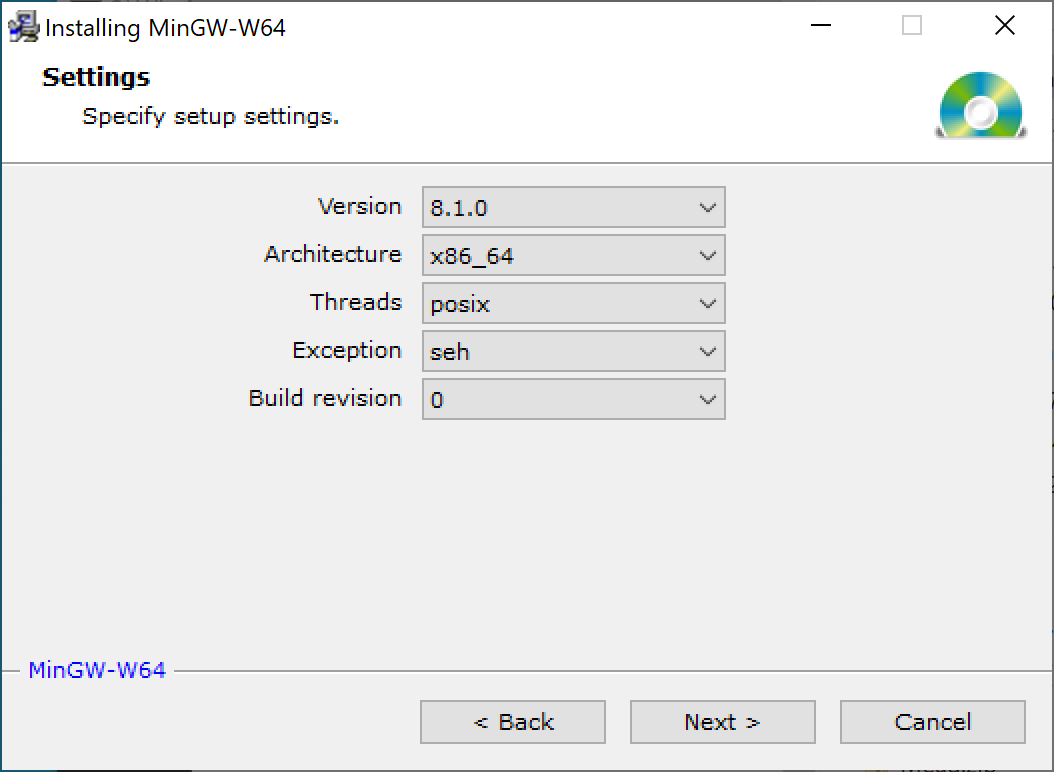
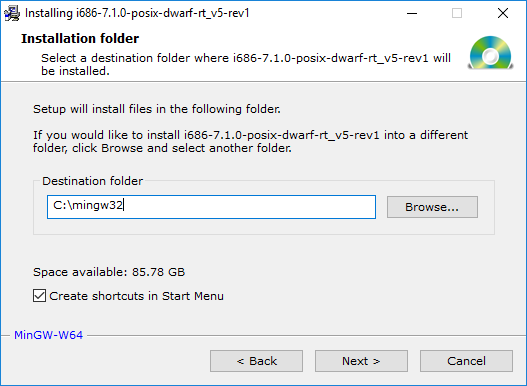
    The rest of this guide assumes that you installed the compiler to c:\mingw32 during the installation.

    Currently, when you type g++ from the command line, you will run the 64-bit version of the MinGW g++ compiler. You want to continue to do that. To run the 32-bit version, you will need to create a batch file called g++32.bat and put it in your PATH somewhere. (You should have created a C:\utils directory on your computer to put your add-on programs. This directory should be the first directory in your PATH.) The contents of the batch file should look like this:

    ::::::::::::::::::::::::::::::::::::::::::::::::::::::::::::::::::::::::
    : This batch file only handles 20 options for the compiler. This should
    : be sufficient. You can figure out how to add more, if necessary.
    ::::::::::::::::::::::::::::::::::::::::::::::::::::::::::::::::::::::::
    @echo off
    
    set /a count=1
    
    :BEGIN
    if "%1"=="" goto END
    set arg%count%=%1
    shift
    set /a count=%count%+1
    goto BEGIN
    
    :END
    c:\mingw32\mingw32\bin\g++.exe %arg1% %arg2% %arg3% %arg4% %arg5% %arg6% %arg7% %arg8% ^
    %arg9% %arg10% %arg11% %arg12% %arg13% %arg14% %arg15% %arg16% ^
    %arg17% %arg18% %arg19% %arg20%
    
    set arg1=
    set arg2=
    set arg3=
    set arg4=
    set arg5=
    set arg6=
    set arg7=
    set arg8=
    set arg9=
    set arg10=
    set arg11=
    set arg12=
    set arg13=
    set arg14=
    set arg15=
    set arg16=
    set arg17=
    set arg18=
    set arg19=
    set arg20=
    

    You can create the batch file with any text editor (e.g. notepad++) or, you can download the batch file here: g++32.bat (recommended). You need to download this file, not click on it and run it (the default in some versions of Windows). There is also a batch file for gcc here: gcc32.bat. Use this to compile 32-bit C programs.

    Once you've downloaded the batch to (or created it in) some directory in your PATH, you can check that it's correct by typing this from any directory:

    g++32 --version
    

    If everything was setup properly, you should see this message in the console:

    g++.exe (i686-posix-dwarf-rev1, Built by MinGW-W64 project) 7.1.0
    Copyright (C) 2017 Free Software Foundation, Inc.
    This is free software; see the source for copying conditions.  There is NO
    warranty; not even for MERCHANTABILITY or FITNESS FOR A PARTICULAR PURPOSE.
    

    Now, when building 32-bit programs, you type g++32 instead of g++. For example, to build a 64-bit program (assume all of the usual command line options)
    g++ file1.cpp file2.cpp file3.cpp -o prog64.exe
    
    To build a 32-bit program:
    g++32 file1.cpp file2.cpp file3.cpp -o prog32.exe
    
    IMPORTANT NOTE #1:

    When running the executable program, if you get an error saying something like:

    "The program can't start because <some_dll_file>" is missing from your computer..."

    or

    "The application was unable to start correctly (0xc000007b)..."

    then you will need to put the bin directory of the 32-bit MinGW compiler at the end of your PATH. If you installed it to the location recommended in these notes, that directory is C:\mingw32\mingw32\bin. The name of the missing DLL file may be something like libwinpthread-1.dll, or libgcc_s_dw2-1.dll, or some other file.

    Note: If you put the bin directory somewhere other than the end of your PATH, it may interfere with your 64-bit compiler causing it to no longer work.

    IMPORTANT NOTE #2:

    When running the executable program, if you get an error message that looks like this:


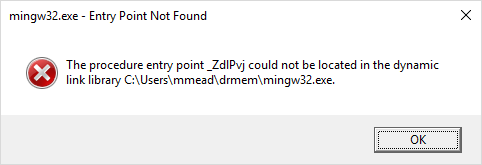
    Then you need to statically link the executable. Add this option (in bold) to the command line:

         g++32 file1.cpp file2.cpp file3.cpp -o prog32.exe -static

    This will make the executable much bigger, but it should avoid the error.

    This is also trivial to override the compiler in your makefile. If your makefile has a macro like this (which all of your makefiles should have)
    CC=g++
    
    You can simply run make like this:
    make CC=g++32.bat
    
    and it will build a 32-bit executable instead of a 64-bit executable. Note that you must provide the .bat file extension for the makefile.

    To verify that your program is really a 32-bit executable, use the file command (part of the Cygwin utilities). For example, this command:

    file prog32.exe prog64.exe
    
    will display this in the console:
    prog32.exe: PE32 executable (console) Intel 80386, for MS Windows
    prog64.exe: PE32+ executable (console) x86-64, for MS Windows
    
    PE32 is a 32-bit (Intel 80386) executable.
    PE32+ is a 64-bit (x86-64) executable.

    Note to Linux and Mac users: Building a 32-bit program under Mac or Linux is trivial. You simply add a -m32 option to the command line. For example:

    g++ -Wall -Wextra -ansi -pedantic -m32 foo.c
    
    That's it!

    Incidentally, to create a 64-bit executable, you can use -m64, but since this is the default, you don't have to provide it to the compiler. If you run the file command on Linux, you would see something like this (with possibly more information displayed)

    prog32: ELF 32-bit LSB  executable, Intel 80386, version 1 (SYSV)
    prog64: ELF 64-bit LSB  executable, x86-64, version 1 (SYSV)
    
    And on macOS you would see this:
    prog32: Mach-O executable i386
    prog64: Mach-O 64-bit executable x86_64